Tuesday, June 29, 2010

My new favorite eco friendly lunch box

***Read below for discount information***


I love this lunch: a little bit of everything and Crunchfuls for dessert!

It's funny all of the things that social media can do for us. I have met some amazing people that would not have crossed my path otherwise. Such is the case for Easy Lunchboxes, my newest find. These are a great eco-friendly lunch box system that makes snack and lunch prep a snap.

The Story
One day, while checking out twitter, I found a link to a new lunch box system that I hadn't seen before, Easy Lunch Boxes. Something about it (especially since it was labeled as a green lunch box) made me interested in learning more. I am trying to get away from what I view as "bad" plastics in my quest to be a somewhat green mom. I've tried stainless steel products but some are heavy or don't fit everything that's needed for lunch. I usually end up with a combination of stainless steel and plastic containers. Besides the worry of the plastic leaching into the food, just trying to keep all of those containers organized is a chore. The last consideration is where the lunch will be sitting. Some of the systems looked good on paper but I realized that a rectangular shape that can sit upright would be best to fit on the classroom shelves. It also needs to fit in a back pack. Who knew there would be all of these things to think about just to make lunch for a 5 year old?!

Why I like the Easy Lunch Box System
Well, I liked the idea of a safe plastic (these are FDA approved, contain no BPA, phthalates, lead, vinyl, or PVC and are safe for dishwasher and microwave) for many reasons; besides the aforementioned, I find the plastic easy to clean and lightweight. The little compartments are great so that I can put all of the different parts of my children's lunch in one place. The lunch system comes with 4 containers and 4 lids so searching for parts doesn't take any more time. If you have access to a microwave (maybe not for the kids), these containers can be used for reheating food as well.

I did learn that if you want to send a yogurt snack, that compartment should be covered with either wax or plastic wrap. The containers fit but are not tight. This is good for little hands to be able to open but not good if you have something liquidy and the lunch bag moves from side to side or is placed on it's side. Still, I'm fine with a work around.

All in all, I've been very happy with this new lunch box system. The owner of the company is a mother of three so she really gets it. She designed these with her family in mind. Kelly has also been very responsive with any of my questions or concerns. I truly appreciate that.

How to Buy and Discount
So whether you are going back to school like an old pro or starting with your first day in August or September, check out the Easy Lunch Box system as an option. If you plan on buying one, use FamilyChef (case sensitive) for a 10% discount good until 9/6/10!

The bags come in all sorts of colors as well. I'll have to get purple for my daughter when she starts kindergarten. The bags fit two plastic containers or one container and room for a water bottle. When I send two containers, I attached the water bottle to the outside with a carabiner (the rock climbing hook which pushes open on one side).

Healthy Lunch Ideas
If you are looking for some ideas for lunches and snacks, check this article. I try to make sure that my kids get protein, carbs, fruit and a veggie. I may not do this everyday but it's a goal. Check the ingredients of what you serve and be careful not to include too many sugary or processed foods. Their teacher will appreciate that!
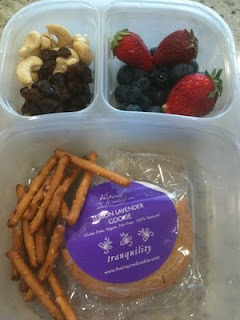
My gluten-free snack box. There aren't many options when I'm out.
Check out this article about the Inspired Cookie here.

Monday, June 21, 2010

Rainbow of Veggies

From the top, red pepper, carrots, zucchini sticks, cucumbers,
cheddar cauliflower, cooked broccoli, raw broccoli and grapes (I needed something purple!)


On the last day of school this year, I didn't walk into the classroom with cookies or cupcakes. Sorry, call me boring or no fun but that's my style. Part of what I love about what I do is that I can test theories on children without them even knowing it.

I am pretty sure if I walked in the door with a platter full of vanilla frosted cupcakes, these 20 children would have wooped and woohooed. Although I think they would have been surprised. All year, I have been talking to them about eating healthy and what that means. I also told them it's ok to have cookies, candy or a treat; after they ate something that was good for them. I don't believe in abstinence when it comes to sweets; my rule is as long as my kids have had some type of growing food first (thanks Dayna for the great term!), it's fine. My hope is that some of the children I worked with this year actually listened to me.

When I walked in the classroom with my container of cut up vegetables, I wasn't even sure how it would go over. The children stood around the table while I explained to them we were going to make a rainbow of veggies. When I talk to children about nutrition, I often suggest they eat a "rainbow" of fruits and vegetables. This helps explain why we need a little of everything; many of the different colors equate to vitamins.

I used a blue platter for the blue and purple grapes. Making beets or cooking blue potatoes wasn't in the cards that morning. They all helped decide in which order the vegetables were placed. Their enthusiasm was contagious!

I then went around and asked each child which veggies they would like along with some ranch dip. Some wanted all; some only wanted a few. There were 4 tables of 5 and by the time I was serving the second table, the first one was done and asking for more. I asked them to wait patiently until I finished serving everyone.

So here was a room of 5 and 6 year olds inhaling (and I'm not exaggerating) fresh, mostly organic, vegetables. My son even tried the red pepper (but still doesn't like them). As parents, we sometimes think that giving children treats and cupcakes is fun for them. Be assured, these children did not even ask where dessert was that day. In fact, they hounded me for more! This was even after their snack.

I hope this post is inspiring to you. I may not be able to change the world but if I can help just a few people, I'll be happy. Leave a comment if you like this. Thanks!

Wednesday, June 16, 2010

Moroccan Slow Cooker Chicken recipe with Almond Millet


Now that the cookbook is really coming along, I'm deciding which recipes to include. When I looked at the recipe for Moroccan Chicken, I realized it would do well in the crock pot (or slow cooker; one's just a brand name). In the cookbook, it's made in a pan but I wanted to try a variation to include. So, here it is.

The bottom line was a delicious combination of flavors and very tender chicken. You can use chicken breast but the thighs come out better when cooked with this method. I chose millet because it's very nutritious and different from rice or pasta. The almonds offer a wonderful crunch and flavor to the dish. If you are a vegetarian, omit the chicken and add an extra can of garbanzo beans.

If you never know what to do with leftover tomato paste, check out this tip. Place remaining tomato paste in a small plastic bag and squeeze out most but not all of the air. Make divisions in the bag and place in the freezer. When you need a tablespoon or so, it's easy to break off a part and the paste will defrost in minutes. This is an example of a tip I'll be providing in the cookbook.

Back to the recipe. The night I made this, the children ate the chicken but not the other ingredients. Since they both like cinnamon, I assumed they would like it but of course, assumed wrong. At first, I was disappointed but then realized that at least they ate something sort of different.

A large part of feeding children is just introducing different flavors and textures. Maybe next time they will be more adventurous and try the garbanzo beans (which they normally eat; go figure). After tasting it myself, it's definitely a winner and cookbook-worthy! I hope you'll try it.

Moroccan Slow Cooker Chicken

1 medium onion, diced
1/2 tsp each cumin, coriander, cinnamon and pepper
1-2 garlic cloves, chopped
1 tsp salt
1- 1 1/2 lbs boneless skinless chicken thigh
14 oz can of diced tomatoes
1/2 c water (use the tomato can)
14 oz can of drained, rinsed garbanzo beans
1 Tbl brown sugar
1/4 c raisins
1/3 c chopped, dried apricots
2 Tbl tomato paste
Add the onions first and then the spices, making sure to sprinkle all over. Add garlic and salt.

Add chicken thighs on top.

Add remaining ingredients. Cook on High for 3 hours.

After it's been cooking for a while, give it a stir so the tomato paste is all incorporated. Serve over Almond Millet.


Almond Millet

1 c millet, rinsed
2 1/2 c water
Pinch of salt
2 tsp butter
1/2 c toasted, sliced almonds

In a pot, add millet to water with the salt. Bring to a boil, cover and lower to a simmer. Cook about 25-30 minutes or until all of the water is absorbed. Add butter and almonds and serve.

Wednesday, June 2, 2010

Easy Yellow Curry Dinner over Quinoa Rice

People may assume I cook everything from scratch but I don't. I like to use tasty sauces as a short cut but get creative with what gets simmered. It's also easy to boost nutrition by adding extra ingredients like quinoa or chopped chard, for example.

Besides eating gluten-free, I am also choosing to eat vegetarian for 5-6 days of the week to force myself to eat more grains, beans, fruits and vegetables. This has been a positive change but also means I have to be more creative with meals.

I keep tofu on hand because my daughter has acquired a taste for it. My son will eat it as well and it's the perfect accompaniment for a simmer sauce since it takes on that flavor. The way to use a simmer sauce is to cook your food in the sauce itself, to give the most taste to each ingredient.

One of my strategies is working in parallel. While the food cooked on the stove, I was chopping. Once the dish started simmering, I prepped the rice and quinoa. I figured both would be done in about 20 minutes and if one was done before the other, that would be ok, too.

The result was a well rounded, really flavorful meal that everyone enjoyed, especially my dear husband. Yellow curry is one of his favorite meals. He also loves jasmine rice. By adding the red quinoa to the rice it maintained the flavor but added a big boost of nutrition. I have to admit, I hadn't thought to do it before but I'm sure I will do it again. Enjoy.

Yellow Curry Tofu

1/2 medium onion, chopped
2 tsp olive oil
1/2 sweet potato, orange or white, chopped (optional; I had one in the pantry to use)
3 carrots, peeled and cut into thick circles
8-10 yellow creamer potatoes (or 3 yukon gold potatoes, chopped in medium pieces)
1 jar yellow curry sauce (I used the World Foods brand)
8 oz firm tofu, cut into cubes

1. Saute onion in olive oil. While that cooks, cut the sweet potato. Add potato to onion and stir.
2. Cut carrots while potato is cooking and add that next.
3. Wash the yellow potatoes and then add to pot. Add entire jar of sauce plus half a jar full of water (place water in jar, place cover on jar, shake and then pour into pot to get all of the extra out).
4. Simmer covered, stirring occasionally, for about 15-20 minutes, or until potato is becoming soft. Add tofu, stir, remove cover and cook another 5 minutes.
5. Serve over red quinoa rice.

Red Quinoa Rice
1 1/2 cups jasmine rice, rinsed with water
4 cups water (use less if you want it stickier)
1/2 cup red quinoa, rinsed

Place all ingredients in a rice cooker and set to cook. If using a pot, bring to a boil, cover and lower to a simmer. Cook about 20 minutes or until all water is absorbed.

Protein Tip: If you want to use chicken breast chunks, cook chicken with onion, remove and add back in for the last 5-10 minutes of cooking. If breast cooks too long, it will become chewy. If you are using chicken thighs, cook that with the vegetables. Cook shrimp the same way you would the chicken breast. If it simmers for a long time, it will also become very chewy.

Kid Tip: If this is too spicy for your children, try removing half of the curry and adding about 1/2 can of coconut milk to mellow it out; save the other half for you. These sauces are flavorful so give it a try. Your children might surprise you. I think mine like it because of the creamy texture. Another good sauce to try is a green curry.

Veggie Tip: Try other vegetables in this curry like peas, cauliflower, red pepper or spinach. Let your children decide which vegetables to put in and if they can help with the prep, even better.