Anyone can be "the family chef". You just need good recipes and techniques! Chef Amy Fothergill shares her best recipes with you for quick and easy dishes with an emphasis on gluten-free.

Get information here about her cookbook, The Warm Kitchen: Gluten-Free Recipes Anyone Can Make and Everyone Will Love.
Showing posts with label vegan. Show all posts

Wednesday, April 30, 2014

Massel products giveaway!

If you've been reading my blog recently you've already heard me rave about Massel's bouillon and stock products. Over the last few weeks, I've experimented with some of the different flavors in my polenta and chicken-less stew recipes and have been very pleased with the results.

Massel prides itself on providing healthful and delicious flavor bases that are vegan and gluten-free. The Australian-based company also uses recycled packaging, harvests its palm oil from sustainable sources and doesn't rely on excess salt or MSG for its taste. In fact, there is no MSG in the products at all.

Massel provided samples of their products for my review.


Want to win everything pictured above?! To enter the giveaway, these are all chances to win:
Comment on this blog post
Like the post on Facebook
Leave a comment on Facebook
Retweet the post on Twitter
Reply to the Twitter post
Like The Family Chef on Facebook and Twitter
Like Massel on Facebook (Search for Massel Stock Cubes Bouillon Powders and Gravies) and Twitter

Leave a comment on this blog entry letting me know which of the above you did. The winner will be announced on Monday, May 12, 2014. Winner must be over 18 years of age and reside in the United States. Good luck!

Wednesday, March 26, 2014

Massel stock makes chicken-less stew taste like chicken

I was first introduced to Massel's bouillon and stock products earlier this year when they asked me to do a few blog posts after reviewing their products. At home, I like to use products that are gluten-free and dairy-free for my family and without a lot of added "stuff". What I didn't know at the time was that all of their products are also vegan. Wow! What a concept. See my first review of Massel's products  here along with their story.

When I was trying to think of what to make, I remembered a recipe from my cookbook that might be the perfect test; a chicken-less stew that tastes like pot pie. In the past, I had made it with milk to make it vegetarian but hadn't tried vegan.

This is a sponsored post and products were provided by Massel. All opinions are my own.

I love this recipe for a few reasons. It was easy. I started cooking at 6:00 pm and had dinner on the table by 6:40 pm. The active cooking time, when I had to be at the stove, was about 15 minutes. I shaved off some time by using Trader Joe's pre-cut mirepoix (onion, carrot, celery). If you had to do that yourself, add maybe 5 more minutes. Another reason I liked it was the whole family asked for seconds. That's always a good sign. I cooked some Mrs. Glee's crazy noodles (my review is here) right in the stew so it became almost like a chicken and dumpling styled dish. These noodles, also vegan, are made from beans. So the third thing I liked about the dish was the high protein, low carb content. Oh wait, there's a fourth. It was so easy, my husband did it with very little direction.

I liked the Massel stock because it was quick to make and very flavorful. I've tried both the bouillon and the stock and liked both of them. So, wait no longer. Get ready. Here's the much anticipated recipe! I posted additional (useful) photos after the recipe. Enjoy. Please leave a comment as well. It's nice to know someone is reading the blog and hopefully getting useful information.

Like the products but want to try them first? Stay tuned for a Massel product give away. Remember to sign up for blog posts via email (don't worry, I don't post very often!) and keep in touch with me on Facebook.

Hearty Chicken-less Bean Stew
Makes 4-6 servings

2 teaspoons olive oil
½ medium to large onion, chopped
2-3 carrots, chopped
2 celery ribs, chopped
1/2-1 teaspoon dried poultry seasoning
1/2 teaspoon black pepper
1/2 teaspoon kosher or sea salt

1-15 ounce can white kidney or cannellini beans, drained and rinsed
2 cups Massel chicken-style broth
2 cups milk substitute, plain and unsweetened
2 tablespoons cornstarch mixed with 2 tablespoons cold water
1 cup frozen peas and/or corn


  1. Heat oil in a medium pot over medium heat. Add onions, carrots, celery, poultry seasoning, and pepper. Without stirring too often, allow to cook until the onion is soft and lightly browned. This gives the stew good flavor. Add salt. Cook for 1 minute.
  2. Add beans and broth. Bring to a boil then lower to a simmer. Cook about 15 minutes.
  3. Add milk substitute and stir. Slowly bring to a simmer.
  4. Stir the cornstarch and water mixture. Add to the pot and stir. Add peas and/or corn. Simmer about 5 more minutes or until thickened, stirring occasionally.
  5. Taste and season with additional salt, pepper, and poultry seasoning.

Saute the veggies and seasonings first.

Drain the beans and prepare the broth.

Finished stew before the noodles.

Wednesday, March 19, 2014

Vegan Polenta tastes great with Massel Bouillon


I suppose we all get used to brands and products that we like. But, as we know, sometimes change is good.

When Massel approached me with an opportunity to review their products, I was curious since I had not tried it before. I liked the fact that their products are clean, free of things like gluten, dairy, MSG and preservatives.

This is a sponsored post and products were provided by Massel. All opinions are my own.

Thank you to Massel for providing the following information:

The story behind Massel
Massel’s products might be new in the US, but it’s the top selling bouillon in Australia and was launched thirty years ago as the first all-vegetable bouillon and the first bouillon with no added MSG in the world. Massel bouillons and seasonings have always been gluten-free.

Massel uses premium vegetables and herbs, extra virgin olive oil and pure sea salt from the Great Southern Ocean, the cleanest ocean in the world. Massel bouillon makes great tasting stocks, broths, soups, stews and sauces, and it’s an incredibly versatile seasoning as well. You can use Massel bouillon and seasoning as a flavor boost for risotto, polenta, quinoa or couscous. You can mix it with extra virgin olive oil and use to bake vegetables, or substitute for salt in any recipe for a tastier, healthier result.

You can check out Massel on Facebook for great gluten-free, vegetarian and vegan recipes or visit MASSEL.COM to learn more about their products.


When the samples arrived, I wasn't sure what to try first; veggie, beef, chicken or turkey. I didn't notice right away that after each of these words on the label was the phrase "style"; these are all made with vegetables. Now I was really intrigued. It's actually fun for me since I love a challenge.

My first recipe to tackle was making a flavorful polenta without dairy. I was getting ready for a party with at least one guest who can't tolerate any dairy. That means no butter, cream, milk or cheese. Olive oil gives the polenta a great texture but it also needs flavor. The veggie bouillon seemed like it would work, so I gave it a chance.

Based on the feedback from the guests, the vegan polenta was a big hit. It was served with a roasted red pepper sauce which was equally as delicious. I included that as well.

I hope you will give this recipe a try and give Massel a try as well. If you are wondering where you can buy their products, use this link.

Look for another post from me soon. I'll be making a hearty chicken-less stew from my cookbook with a Massel product. For now, enjoy the polenta!


Grilled Vegan Polenta Circles
Serves 4-6


3 cups water
2-3 Massel veggie bouillon cubes
1 cup coarse polenta
1 tablespoon olive oil plus 2 teaspoons
1/2 - 1 teaspoon kosher salt
1/4 tsp ground pepper

1. Bring water to a boil in a medium to large pot. Add bouillon cubes. Stir until the cube is dissolved. While water is boiling, slowly add polenta in a steady stream, whisking constantly. Add 1 tablespoon of olive oil, salt and pepper (start with the 1/2 teaspoon of salt and add more if necessary).
2. Lower heat and simmer until thickened. If bubbling, lower the heat. Stir occasionally. Continue to cook the polenta until thick (about 15-20 minutes) and pour into a greased baking pan.
3. Let cool for 10-15 minutes or refrigerate until the next day, covered.
4. Heat medium to large sauté pan over medium heat. While the pan heats, cut polenta into circles. Place the circles on a plate.
5. Add 2 teaspoons of olive oil to the pan. Add polenta and fry on each side until golden brown. Serve immediately with the red pepper sauce.

Roasted Red Pepper Sauce


2-3 red bell peppers
2-3 tablespoons extra-virgin olive oil
1-2 garlic cloves (if you want something less pungent, roast them first)
2 teaspoons balsamic vinegar
1/2 teaspoons sea salt
Fresh ground pepper to taste

1. Roast the red peppers directly over a gas flame or under the broiler, turning occasionally, until the peppers are blackened all over.
2. Immediately transfer the peppers to a bowl and cover with plastic wrap or place them in a brown lunch size bag and fold it up. Let cool about 10-15 minutes. Peel the peppers and discard the skins, seeds and cores.
3. In a food processor, combine the peppers with the olive oil, garlic, vinegar, salt and pepper. Puree until very smooth. Season the sauce with more salt and pepper if needed.

Monday, February 17, 2014

You Get Much More Than Lemonade With This Cookbook


Buy the book from Amazon here
The name "The Lemonade Cookbook" might lead one to believe that the cookbook is about making lemonade. If you are not from the Los Angeles/Southern California region, you might actually think this. However, those from the area are probably more familiar with the cafeteria style eatery that features fresh, family-friendly dishes (umm, sound familiar?). Lemonade is described as modern cafeteria where visitors enjoy a rotating daily spread of deliciousness, offers fresh fare that tastes as though every culture is stirred into the pot.

And that's what you will get with the book. Author Chef Alan Jackson has a style I can relate to as well. Besides being the father of 3 children, he is a successful restaurateur; he has opened 12 locations since the first one in 2007. He saw the need for quick, affordable food that was also healthy. What does a guy like Jackson do? He created a chef-driven approach to dining.

What I like most about the recipes in this book is that I want to make most of them. The photos are vibrant and detailed and the recipes are not too complex. The page below is one of my favorites; just a simple photo of different cuts (although I do have to admit it gave me a flashback to culinary school). Don't be intimidated with something like this; you do not have to be a chef to use this book.


I also like how the book is laid out. When is the last time you saw "braises" as a chapter? You can also find market vegetables, land + sea, soups and stuff, and of course, lemonade (which is harder to type than you would think; I keep typing "lemondade").  

Since we eat a gluten and dairy free diet, I wasn't sure whether or not I would be able to use these recipes. After flipping through the book, I quickly realized it would be easy to make substitutions. For example, I used almond milk instead of regular milk and gluten-free breadcrumbs in the buttermilk chicken. For the salad, I used gluten-free tamari for the soy sauce; that was easy. Most recipes can be adapted easily. 

So, my recommendation is yes, buy this book if you like to cook. Get ready to be inspired. Feel free to put your own personal spin on the recipes. I don't think Chef Alan will mind. 

Photo of Buttermilk Baked Chicken, courtesy
of The Lemonade Cookbook


My version of the chicken dish


Photo of Edamame, Snap Pea, Sesame Vinaigrette courtesy of The Lemonade Cookbook

My version of the salad with green beans and snap peas
As you see from the photos above, my versions are pretty darn close, even with my variations. Below are the recipes provided by the Lemonade Cookbook. Thank you for also providing me with a book for this review.  Enjoy!

Buttermilk-Baked Chicken
From The Lemonade Cookbook by Alan Jackson and Joann Cianciulli. Copyright © 2013 by Alan Jackson and Joann Cianciulli and reprinted by permission of St. Martin's Press, LLC.

Serves 4

Amy's Notes: I made my own buttermilk with almond milk and vinegar (add 4 teaspoons vinegar to a 2 cup measure and then fill with milk to the 2 cup mark). However, I think 1 1/2 cups would have been enough. I used less tabasco since my kids are sensitive to spice. I used a gluten-free panko bread crumb. I might not have dried off the chicken breast well enough; it was soggy. However, if it was completely dry, I didn't know how the chicken would stick to the panko. Might have to try it again. I love-love-loved the flavor of the chicken and will definitely do this again. 

Marinade:
2 cups buttermilk
1 tablespoon dijon mustard
1 tablespoon hot sauce, such as tabasco
2 teaspoons paprika
1 teaspoon coarse salt, plus more for seasoning
1 onion, coarsely chopped
5 garlic cloves, smashed

4 (6-ounce) skinless boneless chicken breast halves

2 cups panko (Japanese-style) bread crumbs freshly ground black pepper
2 tablespoons canola oil

To prepare the Marinade, in a large mixing bowl whisk the buttermilk, mustard, hot sauce, paprika, salt, onion, and garlic together to combine. Put the chicken in a plastic storage bag, add the buttermilk mixture, and smoosh the chicken around to thoroughly coat in the marinade. Press out the air, seal the bag, and marinate the chicken in the refrigerator for at least 24 hours, preferably up to 2 days.

When ready to cook the chicken, preheat the oven to 400 degrees F. Remove the chicken from the Marinade, wiping off any excess buttermilk, and discard. 

Season both sides of the chicken breasts lightly with salt and pepper. Spread the breadcrumbs out on a flat plate. Press the chicken breasts into the bread crumbs to completely coat all sides, shaking off the excess.

Put a cast-iron or ovenproof skillet over medium-high heat. Coat the pan with 2 tablespoons of oil. Once the oil is shimmering, lay the chicken in the pan—you may have to do this in batches. Sear for 3 minutes on each side. Nestle the seared chicken breasts side by side in the skillet. Transfer the skillet (and chicken) to the oven and bake for roughly 20 to 25 minutes or until the chicken is cooked through and the crust is golden.

Edamame, Snap Pea, Sesame Vinaigrette 
From The Lemonade Cookbook by Alan Jackson and Joann Cianciulli. Copyright © 2013 by Alan Jackson and Joann Cianciulli and reprinted by permission of St. Martin's Press, LLC.

Makes 4 cups

Amy's Notes: I try to avoid soy beans so I used green beans instead. I did not have black sesame seeds so I used regular. I substituted scallions instead of chives and the shallot. I also added a drop of honey to the marinade as it was tart.

½ pound sugar snap peas (2 cups), ends trimmed
2 cups shelled edamame (green soybeans), frozen, thawed, and cooked
1 large shallot, minced
¼ cup chopped fresh chives
½ cup sesame vinaigrette
1 tablespoon black sesame seeds
½ teaspoon coarse salt
¼ teaspoon freshly ground black pepper

Bring a large pot of well-salted water to a boil over high heat. Prepare an ice bath by filling a large bowl halfway with water and adding a tray of ice cubes.

Blanch the snap peas for only about 2 minutes; they become tender very quickly. Using a slotted spoon, remove the snap peas from the water and plunge into the ice bath to “shock” them, i.e., to stop the cooking process and cool them down right away. This procedure also sets the vibrant green color of the peas. Drain the snap peas in a colander.

Put the blanched snap peas in a mixing bowl. Add the edamame, chives, and vinaigrette, tossing to coat. Sprinkle with the sesame seeds, salt, and pepper, tossing well. Serve chilled.

Sesame Vinaigrette
Makes 1 cup

Amy's Notes: I made half of this recipe and still didn't need it all for the recipe above. 

½ cup seasoned rice vinegar
2 tablespoons sesame seeds, toasted
1 garlic clove, minced
1 tablespoon dijon mustard
1 tablespoon soy sauce
¼ cup canola oil
2 tablespoons sesame oil
¼ teaspoon freshly ground black pepper

In a small mixing bowl or mason jar, combine the vinegar, sesame seeds, garlic, mustard, soy sauce, canola and sesame oils; season with pepper. Whisk or shake to blend. Keep any left-over vinaigrette covered in the refrigerator for up to 1 week.

Sunday, December 8, 2013

Gluten-Free Falafel

The gf falafel mixture before adding flour

I'm embarrassed that I don't have that beautiful, focused in the foreground-blurry in the background photo of my completed falafel. We got so caught up in the making/eating, we forgot! I promise they looked just like what you would expect; crispy brown on the outside and greenish-flecked on the inside. 

It annoys me that 99% of the falafel found in the US has gluten; falafel are traditionally made with chick pea or garbanzo bean flour. It's also traditionally vegan; no animal products, like eggs or milk, are needed. Yea! 

So here are the important tips:
-The onion and garlic add a lot of flavor. Use less garlic if you don't like it spicy. 
-The mixture should not be wet (I made this mistake). Make sure to add enough garbanzo and/or gluten free flour to bind it together. 
-I used a combo of cilantro and parsley because that's what I had (and we all love cilantro). Use what you have. 
-Although you can bake these at a high heat, frying (even if it's just pan-fried) will give the best texture. 
-If you have more time, the traditional way to make falafel is to soak about 1/2 cup of dried garbanzo beans (so that you have the right amount for this recipe; you can always soak more) in water for 12 hours. Drain and rinse. Use this in place of the can of garbanzo beans. However, this requires at least a half of a day's worth of planning which we don't always have.
-I couldn't find fresh tahini sauce so I served it with hummus. Use what you have. It will be delicious.

-If you can't find or don't want to make fresh gluten-free pita, serve in lettuce wraps or a gluten-free roll. I like the ones from Schar. My husband brought these gluten-free pita back from the UK; they are the best I have had so far (and notice they are almost all gone).
Gluten-Free Pita from Sainsbury's, a UK based grocery store

Enjoy the recipe and don't be afraid to try these. They are easy, quick and delicious. I showed my husband how to make them so I think we have a new rotation in our household!

Gluten-Free Falafel
Makes 13-14 2” patties

1 15 ounce can garbanzo beans, drained and rinsed
1-2 cloves garlic, chopped into 4-6 pieces
1/4 onion (or 1/2 small), cut into chunks
1/4 cup fresh parsley, rinsed and dried off, big stems removed
1/4 cup fresh cilantro, rinsed and dried off, big stems removed (or use all parsley)
1/3 cup chick pea or garbanzo bean flour 
Juice of 1/2 lemon
3 tablespoons olive oil
1/2 teaspoon cumin
1/2 teaspoon coriander
1/2 teaspoon sea or kosher salt
1/4 teaspoon ground pepper

1/4-1/2 cup gluten-free flour blend (without xanthan gum)

2 tablespoons vegetable oil for frying

1. Place all ingredients except flour blend and vegetable oil in a food processor. Puree until slightly chunky but almost smooth, scraping down the sides at least once. If it's too chunky, add a teaspoon of water and process again. Remove and place in a medium bowl. 
2. Add 1/4 cup flour blend and stir. You should be able to make patties that do not fall apart. If the mixture seems too dry, add more water, 1 teaspoon at a time. If the mixture seems too wet, add more flour. It should be moist but able to form into a patty.
3. Form into patties and fry in large pan with enough oil to cover the bottom of the pan. Cook until golden brown on each side. Serve with tahini sauce and/or hummus.

Sunday, July 28, 2013

Easy tamale pie: gluten-free and dairy-free


A few years ago, I made a version of tamale pie where I made tamale dough and put something in the middle (honest, I can’t remember; it might have been chili inside). I’m not sure why that went out of my rotation. More recently, I made a tamale pie as more of an experiment with black beans and salsa on the bottom and tamale dough on top. That was a huge hit.

I was in a “conversation” with another mom blogger on twitter about tamale pie and she asked if it was dairy-free too. One thing I don’t use is any cheese or butter because my daughter is sensitive to dairy. I know this would be really good with cheese inside but it's not an option for us. So, I made it a little creamy with coconut milk instead.

It’s gluten-free in the sense that it does not have any gluten ingredients. However, when I was doing some research I found that some of the masa mixtures can be contaminated either in production or delivery. If you are Celiac or intolerant, make sure the masa is “clean” as this is one potential way gluten can sneak in. I used Minsa masa for tamales.

What I like about this recipe is the method; I am the queen of technique! The filling can be anything you want. I would suggest something that is not too dry so that the filling is still moist. The filling was kind of soupy but it was perfect after being cooked. The dough is really easy and even easier to make dairy-free. Once everything is measured, it took less than 10 minutes; maybe closer to 5. After the dough is prepared, get it in the pan right away and into the oven. Since it has baking powder in it, it will start reacting once the liquid is added.

The recipe for the filling made about a cup more than I needed but I didn’t mind as I saved that for another meal for one of my kids. If you want something even quicker, see the note below in the filling instructions. And of course, enjoy!

Chicken, Corn and Black Bean Tamale Pie 
(omit chicken for a vegan version)

Filling:
1 teaspoon olive oil
1½ pounds boneless skinless chicken thighs
½ teaspoon kosher salt
¼ teaspoon ground pepper
½ teaspoon dried oregano
1 teaspoon chili powder
¼ teaspoon cumin
About 1 cup chicken broth
2 tablespoons salsa or pico de gallo (I used some I had leftover from a taqueria visit)

1 cup plain unsweetened milk substitute
1 tablespoon of cornstarch
2 cups corn, cooked, fresh or frozen and thawed
1 can black beans, drained and rinsed
1 tablespoon chopped cilantro and/or 2 tablespoons salsa
Note: You can skip steps 1-4 and use about 2 cups of cooked chicken seasoned with some Mexican seasonings and/or add more salsa to the filling. Or, for a vegan version, omit the chicken, start on step 5, and add another can of black beans.

1. Make the filling. Heat a 3 quart sauté pan to medium (one that has high sides). Add oil and swirl in pan. Add chicken thighs. Sprinkle seasoning over chicken (salt, pepper, oregano, chili powder and cumin). Do not move chicken in pan.
2. After about 5 minutes, turn over and cook another few minutes.
3. Add broth and salsa (if you don’t have salsa, just add the broth), bring to a boil then lower to a simmer. Cover and cook about 1 hour or until tender.
4. Remove chicken and cut up into bite sized pieces. Strain broth and use for next step. Reserve what is in the strainer and add to chicken. Cool.
5. While the chicken is cooling, thicken the milk substitute. I use coconut milk from the carton, not can, for this dish. Heat up the milk until almost hot. In a small bowl, mix the cornstarch with a tablespoon of cold water. Add this to the milk and stir. Continue cooking until thickened. Cool slightly.


6. In a medium bowl, add chicken, corn, black beans, cilantro, salsa, and coconut milk. Taste the filling and make sure it’s seasoned well. If necessary, add more salt, salsa, cilantro, or spices. Set aside. It should be “wet”. Remember, you might have extra filling.

Tamale Dough
3/4 cup shortening or butter, softened
3 cups masa for tamales (some brands might not be gluten-free; always check with the manufacturer)
2 teaspoons baking power
3/4 teaspoon salt
3 cups chicken or vegetable broth

1. Preheat oven to 375F. Grease a 13”x9” pan (I used an oval baking dish that was slightly smaller).
2. In a large mixing bowl, beat the shortening or butter until fluffy and smooth.


3. In a separate bowl, combine the dry ingredients (masa, baking powder and salt). Slowly add the chicken broth and mix until fully incorporated.


4. Add the masa mixture to the shortening or butter. Mix thoroughly with a wooden spoon or electric mixer, making sure all of the shortening is mixed in.


5. Place half of masa mixture in the bottom of the pan and spread evenly. Add enough chicken mixture to cover the masa and spread on top; reserve extra filling for another use. Top with the remaining masa mixture and spread evenly.


Top with a greased piece of foil and place in the oven. Bake 40-45 minutes covered. Dough should be cooked and mostly firm.
6. Let rest 5-10 minutes and serve.


Thursday, February 28, 2013

Curried cauliflower with peas


 A big thank you to Aida Mollenkamp (see my interview with her here) for this recipe from her recent book "Keys to the Kitchen." I have made this twice, both times with much success. The children (now almost 9 and 7) loved it as well. I put my family chef spin on it so it's not quite as spicy. I hope you'll try it, even if you think your kids are picky eaters. It's worth a shot!


Curried Cauliflower with Peas
Adapted from a recipe by Aida Mollenkamp
Serves 3-4

Vegetable oil
2-3 teaspoons grated fresh ginger (I used ginger paste)
2-4 teaspoons mild curry powder, divided (see note)
1 head cauliflower, cut into bite-sized pieces
½ - 1 teaspoon kosher salt, divided
1 yellow onion, chopped
¼ teaspoon ground pepper
2 garlic cloves, minced
1-2 russet potatoes, peeled and diced
1 cup chicken or vegetable broth
Optional: 1 cup cooked beef (ground or chopped steak)

1 cup frozen peas, slightly thawed
¼ cup cilantro or mint, roughly chopped
Flour tortillas (regular or gluten-free) or about 2 cups cooked brown rice

Note: To make your own mild curry powder, mix together 2 tablespoons each cumin and coriander, 2 teaspoons turmeric and ½ teaspoon each ground ginger and mustard. Add cayenne pepper or crushed chile peppers to make it spicy. Store the spice mixture in a spice jar until ready to use.
1. Heat 2 teaspoons of oil in a large frying pan over medium high heat.  As soon as the oil is shimmering, add the ginger, half of the curry powder and all of the cauliflower. Season with ¼ teaspoon salt and cook, stirring occasionally until fragrant and the cauliflower is golden brown, about 5-7 minutes. Remove and set aside in a bowl or on a plate.
2. Place pan off-heat on the stove. Add 2 teaspoons of oil to the same pan with the onion, ground pepper, and remaining curry powder (you can add more curry powder later so go lightly until you know the amount you like). Place the pan back on medium heat. Once onion is soft, add the other ¼ teaspoon salt and garlic. Cook for 1 minute.
3. Add cauliflower, potatoes, broth, and beef, if using. Bring to a boil.
4. Lower the heat, cover, and cook about 5 minutes. Stir and continue to cook until potatoes are knife tender, about 8-10 minutes. Add the peas and cook about 2 minutes or until heated.  Adjust the seasonings by adding salt or curry if needed.
5. Top with chopped cilantro or mint and serve with regular or gluten-free flour tortillas or over brown rice.

Tuesday, October 9, 2012

Roasted Red Cabbage


This is in the category of "things you should not assume your kids won't like". A friend of mine (thank you Kristen!) served it at dinner a few years ago and I was amazed that my then 5 year old daughter loved it. I really was shocked! However, my then 7 year old ate it but I'm not sure he loved it. I'm okay with that.

There's really no recipe; it's more of a method. Here you go:
Preheat oven to 375F. If you have convection, use it for this dish.
I use about 1/2 of a cabbage for our family of 4. Many grocery stores will cut a cabbage in half for you if you don't think you will use the rest.
Remove the white core from the middle. Cut the cabbage into wedges. 
Drizzle with olive oil. Season with salt and pepper. 
Roast about 12-15 minutes or until you can smell the cabbage. Cabbage should be tender with a little browning. Serve as is.

Tuesday, August 7, 2012

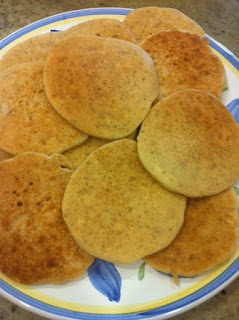
Gluten-free, dairy-free and egg-free pancakes

Yes, I hit the trifecta on this recipe. I was able to successfully make a pancake without gluten, dairy (in essence, casein) and eggs! It is a vegan, gluten-free pancake.

I have been cooking gluten-free for 5 years. That I have figured out. I like to use my own blend (see the recipe for the link) in place of flour. I have found, through trial and error, that the pancake is better with some xanthan gum. It holds together better.

Substituting the milk is easy. There are many milk substitutes like soy, rice, coconut, hemp, and almond. If you use something sweetened, cut back on the sugar in the recipe. Instead of butter, you can use any fat; vegetable oil, or melted butter substitute, coconut oil, or shortening. For the most part, fat is fat.

Egg substitutes are a bit trickier. I have been using a mixture of flaxseed with water (1 tablespoon ground flaxseed mixed with 3 tablespoons of water) which helps to hold it together. Another egg substitute can be made with 2 tablespoons of water, 1 tablespoon of oil and 2 teaspoons of baking powder. This helps to replicate the rise. I ended up using a combination of these two to substitute the 2 eggs that are normally in this recipe. If you don't need the egg substitute, use 2 large eggs.

Being on a special diet is not easy, especially when you combine a few foods. It helps that I have experience. I remembered that when my daughter first started her elimination diet five years ago, I was not cooking with eggs, dairy, or gluten. I guess I got back on the bike and just started riding. Enjoy this recipe!

Gluten-free, Dairy-free, and Egg-free Pancakes


Makes 12-16 pancakes

Only make one or two recipes at a time. Baking powder does not increase the same way the other ingredients do and it can give the batter a strange taste.

2 cups Amy's Gluten-Free Flour Blend
2 teaspoons baking powder
1 teaspoon sea or kosher salt
1/2 teaspoon xanthan gum
1/2 tsp cinnamon (optional)

1 1/2 cups milk substitute
1 tablespoon white vinegar or lemon juice

5  tablespoons water
1  tablespoons oil
1  tablespoons ground flaxseed
2 teaspoons baking powder

3 tablespoons vegetable oil or melted shortening
3 tablespoons organic sugar or other natural sweetener
1 teaspoon vanilla

1. In a large bowl, mix flour, baking powder, salt, xanthan gum, and cinnamon. Set aside.
2. In a 2-cup measuring cup, add milk substitute and vinegar. Set aside for 5 minutes.
3. In a small bowl, mix water, oil, flax and baking powder. This is the egg substitute. If you can tolerate eggs, use 2 large eggs and add to the next step. Otherwise, set mixture aside for 5 minutes.
4. Add milk mixture, flax mixture and remaining ingredients to the bowl of dry ingredients. Whisk together until there are no more lumps but without overmixing.
5. Allow to rest for 5 minutes before using. Batter should be fairly thin so you can pour easily. Add more milk or cold water if necessary. Make sure to use a flat pan and cook at medium heat. Non-stick is easiest.
6. Pour about 1/2 cup of batter per pancake onto the hot pan. When bubbles are starting to form on top, turn the pancakes over. The pancakes should be golden in color. Cook on the other side for 2-3 minutes.