Anyone can be "the family chef". You just need good recipes and techniques! Chef Amy Fothergill shares her best recipes with you for quick and easy dishes with an emphasis on gluten-free.

Get information here about her cookbook, The Warm Kitchen: Gluten-Free Recipes Anyone Can Make and Everyone Will Love.

Thursday, July 1, 2010

Healthy school lunch ideas for kids

Ham "sushi" roll-ups with a little bit of everything
(Here's my review of the eco friendly lunch containers I love to pack lunches in.)

The other day, when I was making lunch for my 2 children, aged 6 and 4, I started thinking about healthy lunches since people often ask me for ideas. That day, I made turkey sandwiches on whole wheat bread, and packed cheese, blueberries, and a combination of cucumbers, carrots and string beans (that’s what was in the fridge). It made me realize something: a healthy lunch is an extension of a healthy diet.

An easy way to think about a healthy meal is a combination of carbohydrates, protein, vegetables and fruit. Keep the sugar to a minimum, especially refined, to make sure your little ones feel good. Once in a while, I’ll add a granola or cereal bar, maybe a sugared yogurt or muffins (cookies and sweets are discouraged at the pre-school and school where both of them attend). The point is, I don’t give them three sugary things in one lunch. Instead, I keep other choices stocked in the fridge and pantry.

I almost always give them whole wheat bread. The best advice I can give you is to read the label. Look for bread that has at least 3 grams or more of fiber in it. Bread should not have a lot of sugar or any high fructose corn syrup. A good rule of thumb is that you should recognize the ingredients. There are lots of options out there which aren’t all dry and crumbly. You can also use whole wheat or spelt (another form of wheat) wraps for sandwiches. When I make ham roll-ups made from wheat lavash with avocado or lettuce, my son calls it ham sushi. It's a new favorite. For kids who want something different, try brown rice sushi or some type of hot meal served over brown rice.

For protein, it involves planning at the grocery store. If your children go to school everyday, you can buy turkey on Sunday and serve it Monday and Wednesday. Make chicken for dinner Monday night and serve that on Tuesday. Thursday can be avocado and cheese and maybe hard boiled eggs or egg salad on Friday. There’s always ham and roast beef to make sandwiches as well. Try to buy natural sandwich meat that does not contain nitrates or added solutions. Here's an interesting discussion if you want more information.

For other sources of protein, use natural peanut, almond or cashew butters or those that are low sugar with no hydrogenated oils. If you are avoiding nuts, try sunflower butter. Jelly or jam should be low sugar and should not contain unnatural sweeteners (i.e. sugar-free). There’s nothing wrong with peanut butter and jelly but it’s better if it’s not laden with sugar.

You can also serve dips like hummus or bean dip which can be made into sandwiches or served with vegetables. My daughter likes tofu; some times I send that in her lunch.

If you are looking for ideas for something other than sandwiches, look to your leftovers. Chicken and rice, macaroni and cheese, soup, and chili are all good options. Just make sure you can keep the hot food hot. Keep in mind that foods which are in some type of sauce or liquid will stay hotter longer.

Balanced Lunches
Are trying to get a little of everything in a lunch? Start with making a lunch that has these four components: Protein, Carbohydrate, Fruit and a Veggie. Here are examples of each.

  • Protein: turkey, chicken, ham, black beans, garbanzo beans, tofu
  • Carbohydrate (always use whole grain): bread, tortillas, crackers, bagel, pretzels
  • Fruit (use seasonal): apples, bananas, dried fruit, berries, melon
  • Veggie (raw or cooked): carrot, celery, peas, string beans, cucumber slices, avocado or guacamole, lettuce, broccoli, pepper slices

Non-Sandwiches
If your children don't like sandwiches or you want some ideas for your own lunches, try these ideas.
  • Cooked sushi (California roll or shrimp)
  • Burrito (wheat tortilla, black beans and jack cheese)
  • Tortilla rolled up w/various fillings like hummus and veggies, cheese, turkey, depending on what's on hand. Roll it up very tightly, then slice into kid-sized pieces
  • Non-sandwiches like turkey rolled and cut into finger food size with a side of whole wheat pita bread wedges
  • Egg salad served with whole wheat crackers
  • Hummus sandwich with arugula or lettuce
  • Avocado and cheese sandwich (add tomato and/or lettuce as well)
  • Crustless quiche/frittata

Snacks for Lunches or After School
For kids that go all day (camp or school), you often have to pack a lunch. Here are some ideas for those snacks or even for after school.

  • Low-sugar muffins
  • Plain yogurt with added fruit or granola
  • Unsweetened applesauce (consider buying a big jar and placing into small reusable containers; much more economical and better for the environment)
  • Orange slices
  • Assorted berries (blueberries, raspberries and strawberries) in a reusable container
  • Veggies like bell pepper, cherry tomatoes, cucumber, broccoli and carrot with small container of ranch dressing, hummus or mayo for dipping
  • String cheese or slices of cheese (less expensive and less waste)
  • Bean dip & corn chips
  • Edamame beans
  • 1/2 sandwich
If you want your children to be healthy eaters, involve them in the process. Ask them which colors they want to eat today. Giving them choices enables them to be part of the decision. Be careful to label foods as good or bad. It becomes more of a balance between “some time” foods and “most of the time” foods. Before you wonder about what to pack for lunch, make sure your cupboard and fridge are stocked with plenty of healthy choices.

Check this blog as well as my website for more healthy, easy recipes.

Tuesday, June 29, 2010

My new favorite eco friendly lunch box

***Read below for discount information***


I love this lunch: a little bit of everything and Crunchfuls for dessert!

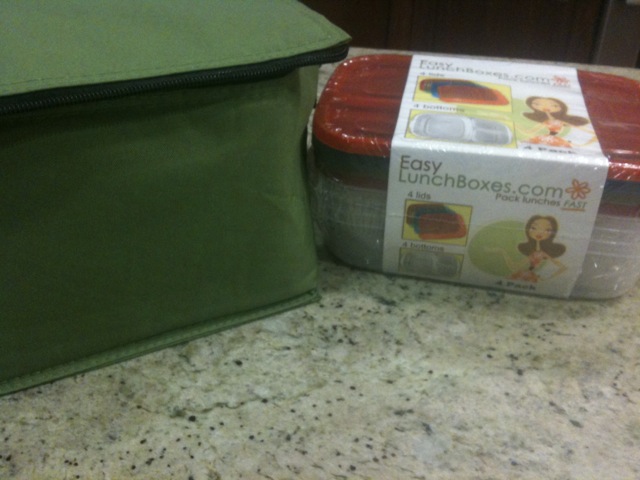
It's funny all of the things that social media can do for us. I have met some amazing people that would not have crossed my path otherwise. Such is the case for Easy Lunchboxes, my newest find. These are a great eco-friendly lunch box system that makes snack and lunch prep a snap.

The Story
One day, while checking out twitter, I found a link to a new lunch box system that I hadn't seen before, Easy Lunch Boxes. Something about it (especially since it was labeled as a green lunch box) made me interested in learning more. I am trying to get away from what I view as "bad" plastics in my quest to be a somewhat green mom. I've tried stainless steel products but some are heavy or don't fit everything that's needed for lunch. I usually end up with a combination of stainless steel and plastic containers. Besides the worry of the plastic leaching into the food, just trying to keep all of those containers organized is a chore. The last consideration is where the lunch will be sitting. Some of the systems looked good on paper but I realized that a rectangular shape that can sit upright would be best to fit on the classroom shelves. It also needs to fit in a back pack. Who knew there would be all of these things to think about just to make lunch for a 5 year old?!

Why I like the Easy Lunch Box System
Well, I liked the idea of a safe plastic (these are FDA approved, contain no BPA, phthalates, lead, vinyl, or PVC and are safe for dishwasher and microwave) for many reasons; besides the aforementioned, I find the plastic easy to clean and lightweight. The little compartments are great so that I can put all of the different parts of my children's lunch in one place. The lunch system comes with 4 containers and 4 lids so searching for parts doesn't take any more time. If you have access to a microwave (maybe not for the kids), these containers can be used for reheating food as well.

I did learn that if you want to send a yogurt snack, that compartment should be covered with either wax or plastic wrap. The containers fit but are not tight. This is good for little hands to be able to open but not good if you have something liquidy and the lunch bag moves from side to side or is placed on it's side. Still, I'm fine with a work around.

All in all, I've been very happy with this new lunch box system. The owner of the company is a mother of three so she really gets it. She designed these with her family in mind. Kelly has also been very responsive with any of my questions or concerns. I truly appreciate that.

How to Buy and Discount
So whether you are going back to school like an old pro or starting with your first day in August or September, check out the Easy Lunch Box system as an option. If you plan on buying one, use FamilyChef (case sensitive) for a 10% discount good until 9/6/10!

The bags come in all sorts of colors as well. I'll have to get purple for my daughter when she starts kindergarten. The bags fit two plastic containers or one container and room for a water bottle. When I send two containers, I attached the water bottle to the outside with a carabiner (the rock climbing hook which pushes open on one side).

Healthy Lunch Ideas
If you are looking for some ideas for lunches and snacks, check this article. I try to make sure that my kids get protein, carbs, fruit and a veggie. I may not do this everyday but it's a goal. Check the ingredients of what you serve and be careful not to include too many sugary or processed foods. Their teacher will appreciate that!

My gluten-free snack box. There aren't many options when I'm out.
Check out this article about the Inspired Cookie here.

Monday, June 21, 2010

Rainbow of Veggies

From the top, red pepper, carrots, zucchini sticks, cucumbers,
cheddar cauliflower, cooked broccoli, raw broccoli and grapes (I needed something purple!)


On the last day of school this year, I didn't walk into the classroom with cookies or cupcakes. Sorry, call me boring or no fun but that's my style. Part of what I love about what I do is that I can test theories on children without them even knowing it.

I am pretty sure if I walked in the door with a platter full of vanilla frosted cupcakes, these 20 children would have wooped and woohooed. Although I think they would have been surprised. All year, I have been talking to them about eating healthy and what that means. I also told them it's ok to have cookies, candy or a treat; after they ate something that was good for them. I don't believe in abstinence when it comes to sweets; my rule is as long as my kids have had some type of growing food first (thanks Dayna for the great term!), it's fine. My hope is that some of the children I worked with this year actually listened to me.

When I walked in the classroom with my container of cut up vegetables, I wasn't even sure how it would go over. The children stood around the table while I explained to them we were going to make a rainbow of veggies. When I talk to children about nutrition, I often suggest they eat a "rainbow" of fruits and vegetables. This helps explain why we need a little of everything; many of the different colors equate to vitamins.

I used a blue platter for the blue and purple grapes. Making beets or cooking blue potatoes wasn't in the cards that morning. They all helped decide in which order the vegetables were placed. Their enthusiasm was contagious!

I then went around and asked each child which veggies they would like along with some ranch dip. Some wanted all; some only wanted a few. There were 4 tables of 5 and by the time I was serving the second table, the first one was done and asking for more. I asked them to wait patiently until I finished serving everyone.

So here was a room of 5 and 6 year olds inhaling (and I'm not exaggerating) fresh, mostly organic, vegetables. My son even tried the red pepper (but still doesn't like them). As parents, we sometimes think that giving children treats and cupcakes is fun for them. Be assured, these children did not even ask where dessert was that day. In fact, they hounded me for more! This was even after their snack.

I hope this post is inspiring to you. I may not be able to change the world but if I can help just a few people, I'll be happy. Leave a comment if you like this. Thanks!

Wednesday, June 16, 2010

Moroccan Slow Cooker Chicken recipe with Almond Millet


Now that the cookbook is really coming along, I'm deciding which recipes to include. When I looked at the recipe for Moroccan Chicken, I realized it would do well in the crock pot (or slow cooker; one's just a brand name). In the cookbook, it's made in a pan but I wanted to try a variation to include. So, here it is.

The bottom line was a delicious combination of flavors and very tender chicken. You can use chicken breast but the thighs come out better when cooked with this method. I chose millet because it's very nutritious and different from rice or pasta. The almonds offer a wonderful crunch and flavor to the dish. If you are a vegetarian, omit the chicken and add an extra can of garbanzo beans.

If you never know what to do with leftover tomato paste, check out this tip. Place remaining tomato paste in a small plastic bag and squeeze out most but not all of the air. Make divisions in the bag and place in the freezer. When you need a tablespoon or so, it's easy to break off a part and the paste will defrost in minutes. This is an example of a tip I'll be providing in the cookbook.

Back to the recipe. The night I made this, the children ate the chicken but not the other ingredients. Since they both like cinnamon, I assumed they would like it but of course, assumed wrong. At first, I was disappointed but then realized that at least they ate something sort of different.

A large part of feeding children is just introducing different flavors and textures. Maybe next time they will be more adventurous and try the garbanzo beans (which they normally eat; go figure). After tasting it myself, it's definitely a winner and cookbook-worthy! I hope you'll try it.

Moroccan Slow Cooker Chicken

1 medium onion, diced
1/2 tsp each cumin, coriander, cinnamon and pepper
1-2 garlic cloves, chopped
1 tsp salt
1- 1 1/2 lbs boneless skinless chicken thigh
14 oz can of diced tomatoes
1/2 c water (use the tomato can)
14 oz can of drained, rinsed garbanzo beans
1 Tbl brown sugar
1/4 c raisins
1/3 c chopped, dried apricots
2 Tbl tomato paste
Add the onions first and then the spices, making sure to sprinkle all over. Add garlic and salt.

Add chicken thighs on top.

Add remaining ingredients. Cook on High for 3 hours.

After it's been cooking for a while, give it a stir so the tomato paste is all incorporated. Serve over Almond Millet.


Almond Millet

1 c millet, rinsed
2 1/2 c water
Pinch of salt
2 tsp butter
1/2 c toasted, sliced almonds

In a pot, add millet to water with the salt. Bring to a boil, cover and lower to a simmer. Cook about 25-30 minutes or until all of the water is absorbed. Add butter and almonds and serve.

Wednesday, June 2, 2010

Easy Yellow Curry Dinner over Quinoa Rice

People may assume I cook everything from scratch but I don't. I like to use tasty sauces as a short cut but get creative with what gets simmered. It's also easy to boost nutrition by adding extra ingredients like quinoa or chopped chard, for example.

Besides eating gluten-free, I am also choosing to eat vegetarian for 5-6 days of the week to force myself to eat more grains, beans, fruits and vegetables. This has been a positive change but also means I have to be more creative with meals.

I keep tofu on hand because my daughter has acquired a taste for it. My son will eat it as well and it's the perfect accompaniment for a simmer sauce since it takes on that flavor. The way to use a simmer sauce is to cook your food in the sauce itself, to give the most taste to each ingredient.

One of my strategies is working in parallel. While the food cooked on the stove, I was chopping. Once the dish started simmering, I prepped the rice and quinoa. I figured both would be done in about 20 minutes and if one was done before the other, that would be ok, too.

The result was a well rounded, really flavorful meal that everyone enjoyed, especially my dear husband. Yellow curry is one of his favorite meals. He also loves jasmine rice. By adding the red quinoa to the rice it maintained the flavor but added a big boost of nutrition. I have to admit, I hadn't thought to do it before but I'm sure I will do it again. Enjoy.

Yellow Curry Tofu

1/2 medium onion, chopped
2 tsp olive oil
1/2 sweet potato, orange or white, chopped (optional; I had one in the pantry to use)
3 carrots, peeled and cut into thick circles
8-10 yellow creamer potatoes (or 3 yukon gold potatoes, chopped in medium pieces)
1 jar yellow curry sauce (I used the World Foods brand)
8 oz firm tofu, cut into cubes

1. Saute onion in olive oil. While that cooks, cut the sweet potato. Add potato to onion and stir.
2. Cut carrots while potato is cooking and add that next.
3. Wash the yellow potatoes and then add to pot. Add entire jar of sauce plus half a jar full of water (place water in jar, place cover on jar, shake and then pour into pot to get all of the extra out).
4. Simmer covered, stirring occasionally, for about 15-20 minutes, or until potato is becoming soft. Add tofu, stir, remove cover and cook another 5 minutes.
5. Serve over red quinoa rice.

Red Quinoa Rice
1 1/2 cups jasmine rice, rinsed with water
4 cups water (use less if you want it stickier)
1/2 cup red quinoa, rinsed

Place all ingredients in a rice cooker and set to cook. If using a pot, bring to a boil, cover and lower to a simmer. Cook about 20 minutes or until all water is absorbed.

Protein Tip: If you want to use chicken breast chunks, cook chicken with onion, remove and add back in for the last 5-10 minutes of cooking. If breast cooks too long, it will become chewy. If you are using chicken thighs, cook that with the vegetables. Cook shrimp the same way you would the chicken breast. If it simmers for a long time, it will also become very chewy.

Kid Tip: If this is too spicy for your children, try removing half of the curry and adding about 1/2 can of coconut milk to mellow it out; save the other half for you. These sauces are flavorful so give it a try. Your children might surprise you. I think mine like it because of the creamy texture. Another good sauce to try is a green curry.

Veggie Tip: Try other vegetables in this curry like peas, cauliflower, red pepper or spinach. Let your children decide which vegetables to put in and if they can help with the prep, even better.

Monday, May 31, 2010

Greek Casserole recipe with a Gluten-Free variation

Yummy Greek Casserole is quick and easy

While trying to come up with quick and easy meals for one of my customers, I envisioned a casserole similar to a Shepherd's Pie but with Greek flavors. I created a base recipe but needed to test it first. My husband even asked where it came from. Uhm, me...

The night I made it we had just gotten back from a trip. I love creating recipes that can be thrown together in 30 to 45 minutes. Even after flying all day, this recipe was still easy enough to make.

You might know that I eat gluten-free. So, instead of making the traditional white sauce with a flour-based roux, I used a cornstarch slurry. Using whole milk and adding a wee bit of butter at the end gave the milk sauce a creamy texture. I didn't miss the flour for a minute. I'll give you both recipes, though, just in case you like the texture of a sauce made from a roux.

Regardless of the gluten, the one tip that I'll give you now that will make a huge impact on the flavor of your dishes is to step away from the stove when you cook ground meat. Heat the pan first and then drop pieces into the pan. Don't break up the meat and don't crowd the pan. Cook until brown on one side, then turn over. Once cooked for a few minutes, begin to break the meat up with the back of the spoon. A simple trick that will do wonders; I promise.

If you don't eat meat, use sautéed mushrooms instead. I have options for everyone.

Let me know how you like it. After seeing the empty bowls tonight, I know the verdict here.

Greek Casserole


1 lb ground meat (beef, lamb, turkey or chicken) or 1-2 cups sautéed mushrooms
2 tsp olive oil
½ onion, chopped
¼ tsp ground pepper
½ tsp each dried oregano and thyme
¼ tsp nutmeg
½ tsp salt
2 garlic cloves minced
2-3 cups of cooked brown or white rice (Tip: cook rice first, then cook the meat and onion)
1 bag frozen chopped spinach, thawed and squeezed dry
½ c Feta cheese, crumbled
2 c white sauce (see recipes below)

1. Sauté ground meat in a large pan until browned and cooked through. Remove and transfer to a bowl.
2. Heat the same pan over medium heat and add olive oil, then onion and seasonings but not the salt. Without stirring very often, cook until golden brown. Add salt and garlic and cook 1 minute. Add ground meat back to pan and cook together for 2-3 minutes.
3. Place the meat and onion mixture into a 13x9 greased pan.
3. Place rice on top of meat, then spinach. Pour white sauce over this and top with the Feta cheese.
4. Bake in a 375ºF oven for about 25-30 minutes or until brown on top and bubbly. Or, bake 20 minutes and then broil 3-5 minutes or until brown.

Optional additions on top of the spinach: Kalamata olives, chopped sun-dried tomatoes or halved cherry tomatoes

White Sauce (made with a roux)
2 Tbl unsalted butter
3 Tbl flour
2 c whole milk
1/2 tsp salt
Sprinkling of pepper, garlic, nutmeg and oregano

To make the roux, in a medium to small sauce pan, over medium to medium-low heat, melt butter. Add flour and whisk.

While that is cooking, heat milk in a glass measuring cup in the microwave until warm (1 minute works well) or on the stove top in a pot. This helps to reduce lumps since the liquid is closer to the temperature of the roux.

After the roux has cooked for 2-4 minutes, slowly add milk to roux, stirring. Add salt, pepper, garlic, nutmeg and oregano. Continue to cook until slightly thickened. You might need to raise the temperature slightly. Taste and adjust seasoning.

Gluten-Free White Sauce (made with a cornstarch slurry)

2 c whole milk
2 Tbl cornstarch mixed with 2 Tbl cold water
1/2 tsp salt
Sprinkling of pepper, garlic, nutmeg and oregano
1/2 Tbl unsalted butter

Heat milk in a medium sauce pan until just beginning to simmer/scald; look for tiny bubbles on the edges.

Whisk in the cornstarch slurry and seasonings. Cook for about 3 minutes or until thickened. Add butter and stir until melted. Taste and adjust seasoning.

Monday, May 17, 2010

Gluten-Free Biscotti

This is often how things work with me. I decide at some point that I want something. Pizza, cookies, a madeleine...and since I'm eating a gluten-free diet, I can't always go to the store to buy it. Or, maybe I can but it's not always good.

So it was, that day, when I really wanted a good biscotti. Believe it or not, I've never even made them, even with gluten! The next part of the journey began with finding the right recipe.

I wasn't in the mood for lemon pecan or orange walnut. I didn't want chocolate either. Cinnamon almond was coming to mind so that's what I decided to try to create. I used this recipe from one of my favorite bloggers, gluten-free girl, and made a few changes, including using less sugar.

The real test was in serving these little delightful treats to my non-gluten free friends. All were pleasantly surprised when I told them my little secret.

I hope you try it and know you'll like it!

Gluten-Free Cinnamon Almond Biscotti

1/2 c almond flour
1/4 c sorghum flour
1/4 c tapioca flour
1/4 c potato starch
1/4 c white rice flour
2 tsp baking powder
1 tsp xanthan gum
1/4 tsp salt
1 tsp cinnamon

8 Tbl (1 stick) unsalted butter, softened
3/4 c sugar (I used 1/2 c brown sugar and 1/4 c brown rice syrup)
2 large eggs
1/2 c sliced almonds, not toasted

1. Preheat the oven to 350°F. Place a piece of parchment paper or a Silpat on a baking sheet.

2. Add the dry ingredients into a bowl (flours, baking powder, salt, xanthan gum, and cinnamon). Using a whisk, mix until well blended. If necessary, use your fingers to break up any big pieces of almond flour or baking powder.

3. Put the butter in a stand mixer. Using the paddle attachment, beat the butter for about a minute and then pour in the sugar. Cream the butter and sugar together until the batter is smooth, about 3 minutes. Add the eggs one at a time until the mixture is fluffy.

4. With the mixture on low, add the dry ingredients in 3 batches. Turn the speed to medium and mix for 1 minute. This helps to "gel" the xanthan gum and hold the dough together. Lower the speed and add the almonds until just mixed.

5. The dough will be sticky. You can either use an ice cream scoop to place the dough on the baking sheet in two long rows or use a greased spatula. Pat down and form each into it's own long log with a spatula. It should be a little flat as well. And yes, it will be sticky.

6. Bake the biscotti for 16-18 minutes, turning around once. Bake until golden and somewhat firm, but still somewhat soft, pushing the top center of the cookie. This is the best way to tell whether it is done. Once done, take the baking sheet out of the oven and allow the biscotti to cool for 10 minutes. Carefully, move them to a cooling rack and leave for at least 30 minutes to firm up.

7. When the biscotti are entirely cool to the touch, place one log on a cutting board. With a serrated knife, cut consistent slices, about 1/2" wide, depending upon how you like your cookies. Move them back onto the baking sheet, bottom side down and repeat with the other log.

8. Heat oven to 350°F again. Once oven is hot, place biscotti back into oven. Bake until they are browned and crunchy, about 16-20 minutes.

Cool them entirely before attempting to eat. Ok, try one if you are drooling but they are better once cooled! Store in an airtight container.

Makes 2-3 dozen biscotti.