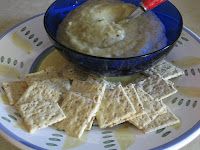
I always think it's fun when you have something in your fridge, just looking at you like "So, what are you going to do with me? Any ideas? Please, just don't throw me away!". Such was the case with an eggplant I bought recently.
When I was growing up, eggplant parmesan was king. But, the process to make it is not easy. You have to peel, slice and salt the eggplant. Then, make a batter and fry each piece. Once you've whipped up your fresh tomato sauce, that gets layered with the slices along with some cheese...I have new respect for my mom and aunt who did this all the time.
 Again, I digress. So, eggplant parmesan was out. I've roasted eggplant in the oven (peeled and cubed) but that's not what I was craving. I have had roasted eggplant dips before and, for whatever reason, always thought they were hard to make. I'm not sure why. I just never tried it.
So, this week, I did a little research and found it's incredibly easy. The next time you are at the farmer's market, I hope you'll think twice about the eggplant. I know I'm happy I did.
And, my family was happy as well. I only put 2 cloves of the roasted garlic so it wasn't too strong. My husband thought it could have had more flavor but my 5 and 3 year olds thought it was guacamole. Ok honey, just add some salt next time! Anytime I can get my children to eat a dip that is basically made of vegetables, I don't mind adjusting the recipe. Next time I make it, I might try it with 3-4 cloves but this time, I wanted to play it safe.
I hope you try it. To me, it was still very flavorful. I even topped it with a little Bariani truffle oil I had in the pantry. Yum-yum.
Roasted Eggplant Dip
1 eggplant, cut in 2 pieces lengthwise
Olive oil
4-5 cloves of garlic
Fresh lemon
Salt and pepper
1. Pre-heat oven to 375 degrees F (or 350 convection).
2. Oil each piece of eggplant. Place flesh side down on a baking sheet. I like to use my Silpat mat that I place on a perforated sheet tray. You can also use parchment paper on a regular baking pan to prevent sticking.
3. Cut the very tops off of the garlic. This will help when it's done roasting so you can squeeze it out. Place garlic cloves on a small piece of foil. Drizzle a little olive oil on top. Close the foil to make a little pouch. Place that on the baking sheet next to the eggplant.
4. Place in the oven for 20 minutes. Turn the eggplants over and turn the pan around 180 degrees. This is always a good idea when baking so that the food cooks more evenly. Bake for another 10 minutes or until the eggplant is soft.
5. Remove from oven and allow to cool. Peel the skin and place the flesh in a food processor along with the garlic (remember, just squeeze it out), juice of 1/2 lemon, salt and pepper to taste. Add more olive oil if necessary.
6. Serve room temperature or cold.
Tip: to make baba ganoosh, add 1-2 Tbl of sesame tahini to this.


