Anyone can be "the family chef". You just need good recipes and techniques! Chef Amy Fothergill shares her best recipes with you for quick and easy dishes with an emphasis on gluten-free.

Get information here about her cookbook, The Warm Kitchen: Gluten-Free Recipes Anyone Can Make and Everyone Will Love.

Thursday, January 29, 2009

Fresh Whole Wheat Pasta

I don't make pasta as often as I should but when I do, I love it. It helps to have the KitchenAid attachment but if you don't, you can roll this through a pasta roller or even with a rolling pin. I've only made semolina pasta but finally got the courage to try whole wheat. It came out just as good, if not better. I might have to try gluten free one of these days!

I served the pasta with a tomato-olive-artichoke sauce topped with feta. I will provide that recipe later. For now, let's talk about the whole wheat pasta. I didn't try all whole wheat flour but I have seen recipes for this. You might have to adjust the water or flour, though. And, remember this is a process; a good weekend project and even more fun with company, i.e. someone to help. Just give it a try; it's worth it and worth the money. Yes, the pasta roller is an investment but you can have fresh, delicious pasta for about $.75 per pound.


Whole Wheat Pasta

2 cups whole wheat flour
2 cups white flour
1 tsp salt
1 egg
1 Tbl olive oil
4-5 Tbl water

1. In the bowl of a stand up mixer, place flours and salt. Mix together with a paddle attachment. In a small bowl or measuring cup, mix the eggs, water and oil. Turn the mixer on, with the paddle attachment on, and the flour in the bowl. Slowly pour the water-egg-oil mixture into the flour, over the course of 30-60 seconds. Feel the dough; it should be tacky but not sticky. Add more flour if necessary or water if it feels very dry.
2. When the dough is formed, switch over to the dough hook and knead for 3-4 minutes.
3. Take dough out and form into a disk. Cover with a damp towel and leave on the counter to rest for at least 30 minutes.
4. Using a knife or pastry scraper, cut the dough into 8 wedges. Working with one wedge at a time, shape into a rectangle and place through the roller at the lowest setting. Fold the dough over once and run it through a few times.
5. Change the setting to 2. Run it through a few times. Repeat with #4 and #5 setting, depending upon how thin you want it.
6. Once you have the sheets done, use the cutting attachment to make either linguine or fettucine. You can also use it for lasagna or cut your own wide noodles for pappardelle. Make sure to keep the pasta well floured so it doesn't stick. Use a pasta drying rack (I love this one) to let pasta dry out while you are rolling and cutting. It helps to have another person for this part.
7. When you are ready to cook, bring a large pot of water to a boil. Add 1 Tbl, yes a Tbl, of salt to the water. Add the pasta all at once, using a spaghetti fork to stir. You don't have to add oil to pasta water; you just have to make sure you have enough water. That is what keeps it from sticking.
8. Cook the pasta 2-3 minutes. Drain and serve immediately. This recipe will make enough pasta for 8 servings. You can cook part of it and save the rest for another day. Keep refrigerated or freeze.
9. Mangia!

Saturday, January 24, 2009

Amy's List of Essential Kitchen Tools and Equipment


I hope you read this blog not just because you want a new recipe but maybe because you look to me for advice in the kitchen. Cooking utensils and gadgets are things I love and I feel they make my life easier. Creating a good meal is a combination of good food and the right tools.

Ok, so here it is. Not counting a good chef and paring knife along with a big cutting board, these are a few of my favorite things:
(and if you want, you can sing to the tune of “My favorite things” from The Sound of Music!)

Three different size processors for chopping and mixing
Two little whisks for blending and whisking
Scissors for cutting pizza and calamari rings
These are a few of my favorite things.

A silicone baking sheet which means nothing sticks
A heatproof rubber spatula that’s also good for licks
Prep lists and shopping lists to make my heart sing
These are a few of my favorite things.

Glass measuring cups,
An instant read thermometer;
For me these are best.
I simply remember my favorite things
And then I don't feel so stressed.

Cute, wasn’t it? Let's talk about why and what these things do.

1. I bought one of those combo immersion blender/whisk/mini choppers a few years ago and found it to be something I really can't live without. Recently, I replaced my old set which was starting to make a gr-rrr-rr noise with the KitchenAid Immersion Hand Blender with Chopper. I use the blender for shakes and soups. It's excellent for pureeing baby food, right in the pot. The mini-chopper makes hummus, bean spread, tuna salad and pesto. The whisk attachment is irreplaceable for a quick fresh whipped cream or beaten eggs. This is really worth the money.

2. Speaking of KitchenAid, a stand mixer is another one of those things I feel is a must-have in the kitchen; I just couldn't figure a way to work it into the song. I make cakes, cookies, bread dough, pasta (see photo left and above) and occasionally fresh whipped cream. I had a 5 qt mixer and felt the need for bigger. Well, as the saying goes, it's not always better. I now have the 6 qt and although the capacity is bigger it is very noisy and some times it's hard to make a small batch of something. I have to constantly scrape the sides down in order for it to mix properly. For most home cooks, go with the 5 qt unless you are cooking for a family over 5.

3. Another brand I really like is Cuisinart. I love my large food processor and use it for shredding everything from carrots to zucchini to potatoes and cheese. The slicer attachment is equally excellent. However, the blade is by far, my favorite. I use it to chop bread into crumbs, whole nuts into tiny pieces and veggies into super small pieces. Be careful with the veggies as they can turn into soup if you over-puree. But what the food processor allows me to become is a wonderful baker. The pie crust, which takes about 3 minutes to prepare, comes out perfect each time. This alone is worth the money.

4. I talked about 3 sized food processors. If you can, get one of the mini ones. I use this for chopping herbs and small amounts of nuts. It saves you from cleaning the large one and will do a better job when you are not chopping a large quantity.

5. Another product from Cuisinart that I really like is their waffle maker. With the right batter and a little bit of time, it's easy to make delicious and healthy waffles in your own kitchen. I vary between plain to pumpkin to gluten free. Making your own probably costs around $.75 or less to make 8-10 7" waffles. I freeze any extra and have breakfast ready to go on a school day. I find that now that the waffle maker is more accessible, I use it more frequently. Keep that in mind. Make sure you can get to it easily.

6. Next on the list of good brands is OXO. Since they specialize in small equipment, I'll just list the ones I love: tongs, both the medium and large, the vegetable peeler, a can opener that takes the top off without leaving a sharp edge (genius), and kitchen scissors. There are many other great OXO products; these are my top picks.

7. Other small utensils that I recommend are things like the unicorn magnum pepper grinder, zyliss cheese grater, Taylor instant read thermometer, a microplane, and heat resistant spatulas. That pepper grinder is the best one I've ever used. My kids can use the cheese grater and I swear, because they can grate their own cheese into their veggie soup, it makes it that much more appealing. An instant read thermometer is just an essential kitchen tool, especially for $7. The microplane makes the best lemon zest, fresh grated nutmeg and ginger. I use my spatulas for everything from scraping jars to scraping batter to cooking eggs.

8. Just when I thought I had every appliance and didn't need one more thing, I got a slow cooker. After "test braising" one for a week, I developed a new respect for what is also called a crock pot. Just so you know, Rival owns the name "crock pot" which is why the other ones are called "slow cookers. I love the one I have for 3 reasons: I can control the time in 30 minute increments, the heat (low and high) and switch between these settings at any time, making it very versatile. Some slow cookers only adjust the time in 2 hour increments or don't allow you to just go to "keep warm" mode. Look for things like this when you shop.

9. Another product that I have been using for the last 3 years which I love is the silicone baking mat or silpat. I use it for cookies, roasting asparagus, baking chicken tenders and even making mess free nachos. If you watch the Food Network, you'll notice the chefs using this mat quite frequently.

10. I must not forget about pans. I've used lots of different ones but when it comes to stainless steel, make it easy for yourself and invest in All-Clad. They are perfect for sauteing, braising, poaching and simple boiling. The heat is conducted well and it cleans relatively easily. I only use oil, no non-stick spray, and have never had a problem. If you don't get a set, at a minimum you should have a saute pan, sauce pan (either 2 or 3 qt), and saute pan with sides. The saute pan is essential for cooking up your veggies or meats and giving them a good sear. The sauce pan is used for everything from sauces to soups to mashed potatoes. The second saute pan is essential for braising. All of these are oven proof up to 500 degrees F which is quite useful.

11. The last but not least essential cooking tool is by far good knives. At a minimum, invest in a good paring and chef's knife. One of my favorite and affordable brands is still Henckels. Make sure to also buy a sharpening steel and ask someone to teach you how to use it. I just walked over to my knife drawer, picked up my 10 year old 8" chef's knife and sharpened it with my steel. It feels like new. If you live near me, I'd be happy to show you.

I hope you like my picks for essential kitchen tools. If you happen to be in Half Moon Bay, stop at Toque Blanche; you can find most of the items I listed above. If you have some of these things in your kitchen but don't know how to use them, you know where to find me.

Thursday, January 22, 2009

Lentil Loaf, aka Meatless Meatloaf

I am very fortunate to hang out with a group of green moms. In the past 3 years, I have been making small changes in my life to become a little more green. I never feel guilty about what I haven't done yet but feel great about what I have accomplished. My journey has been a series of baby steps.

Once a month or so we have a vegetarian pot luck. If you know me, you know I'm not a vegetarian but I always consider it after these meals as I feel so satisfied as well as healthy. To me, cooking without meat means you have to be more creative with flavors and textures. I had wanted to create a tasty lentil loaf for a while, but lacked the motivation. When I saw that the topic was legumes and winter veggies, I decided to give it a try.

I knew some of the main ingredients I wanted in the dish; lentils, maybe brown rice, veggies and possibly nuts. I found this recipe and really liked the structure of it. When I cook, that's usually what I do. I use a recipe as a general guideline but not as a road map so I might get there a different way. Although the end result was delicious, you need to have time for this one as the lentils and rice have to be cooked. You certainly could use leftovers so if you plan ahead on another day, the ingredients could be sitting in your fridge.

Ground nuts are a great way to replicate the texture of meat. I decided to toast mine in a non-stick skillet. Toward the end, I threw in some wheat germ I had in the fridge for flavor and extra nutrition; it takes on a new character when toasted. The oats help to bind it but I could have used bread crumbs as well. I feel like cooking is all about what you have on hand.

The recipe had originally called for barley. I didn't have enough so I used a combo of barley and short grain brown rice. Why did I cook it together? Hands on your buzzers, please...the cooking time is almost the same and the grain size is almost identical. That also meant one less dish to wash for me.

The key to this dish is working in parallel. Here are the steps but the first 3 should be happening all at the same time:
  • Cook the barley/rice (this takes the longest)
  • Cook the lentils
  • Chop and cook the veggies
  • Toast the walnuts and wheat germ; cool, then place in food processor with the oats
  • Mix it all together and bake
Let's move on to the recipe itself. I really think I'm going to make this again, even if most of the time I'm a carnivore. I hope you'll give it a try.

Amy's Lentil Loaf

1/2 c barley or short grain brown rice (or a combo of both)
1 c brown lentils
Salt
Olive oil
1 carrot, chopped
1/2 onion, chopped
1 stalk celery, chopped
Herbs de Provence
Pepper
1 Tbl tomato paste
1/2 c walnuts
1/4 c wheat germ
1 c oats
1/2 c ketchup + 2 Tbl for the top
2 Tbl brown mustard
1 Tbl soy sauce
1/4 c Milk or water
1 egg, beaten

1. Cook rice or barley: bring 2 1/2 cups water to a boil. Add rice/barley and a pinch of salt. Cover and bring back to a boil and then simmer for about 40 minutes. Check after 30 minutes; you may need to add more water.
2. Cook lentils: add 1 cup of rinsed lentils to 3 cups of water with a pinch of salt. Bring to a boil and then lower to a simmer. Cook about 25-30 minutes, covered. Leave cover off toward the end if there is still a lot of water.
3. Cook veggies: Heat oil in pan. Add carrots, onions and then celery with seasonings until golden brown. Add 1/2-1 cup water and allow to evaporate. This will help soften the veggies and get all of the flavor from the pan. Add tomato paste and salt to taste.
4. Toast walnuts in a non-stick skillet until golden, adding wheat germ toward the end to lightly toast. Cool. Add this with the oats in a food processor and pulse until finely chopped (or chop on a cutting board).
5. Pre-heat oven to 350 degrees F. Spray a loaf pan with non-stick spray or coat with oil.
6. Once lentils, rice, and veggies have cooled, mix in a large bowl. Add the remaining ingredients EXCEPT egg. Season with salt and pepper. Taste the mixture and make sure it has enough flavor. Once you are happy, add the egg and mix well. Make sure the mixture is somewhat "wet" or else it will be crumbly instead of moist. You can add more milk or water if necessary.
7. Place in loaf pan and top with ketchup. Bake for 45 minutes or until the internal temperature reaches at least 160 degrees F.
8. Allow to rest for 5 minutes and then cut. Serve with a mushroom sauce.

Wednesday, January 21, 2009

Weeknight Meals-BBQ Chicken Tenders


I recently attended the Fancy Food Show in San Francisco. When I used to go to the Food Show in NYC back in college, I remembered it being about how many samples we could find and gadgets we could leave with. This time, I went looking for products that I like to term "my kid would eat this".

My tastings ranged from boxed to gluten free cookies, caramel-way-too-much-sugar popcorn to pesto and romano cheese popcorn (yum). I had Strauss soft serve ice cream, local goat cheese and some delicious chocolates (all of which my kids would eat). I also got to sample some great sauces.

I tasted many sauces and two stood out; Bone Suckin' Sauce and a steak sauce (look for another post on this). After walking around for hours trying all of these products, I felt obliged to start writing about them, in hopes that you might try it, too. My criterion was something that tasted good, felt good on the tongue and wasn't too spicy. I found that this tends to be what my children look for as well. Lastly, I look for sauces that don't have a lot of "not so good for you" things like high fructose corn syrup or ones which have ingredients I can't pronounce.

If you have a prepared sauce and some protein in the fridge or freezer, you might chose to stay home and cook rather than simply ordering take-out. This can prove to be a delicious alternative. It can make a meal that might be ho-hum into something that becomes, as my almost 5 year old put it, "awesome". Really, that's what he said about this.

I didn't want to fuss too much yet I felt inspired to cook something tasty. With my jar of bbq sauce, I decided to go with something simple; sauteed chicken tenders. Instead of rice or pasta, I made millet. Millet is a whole grain, can be found in the bulk aisle of the grocery store, is a good source of magnesium, and is naturally gluten-free. It cooks like rice but is spongier. I like to add a little butter and salt. To make life easy, though, I just called it rice.

At the end of the meal, the plates were mostly cleaned. My son and daughter both enjoyed the chicken first (as did my husband and I) and the millet with the kale coming in third for them. The point of this is that by simply adding a tasty sauce to an easy dish, you might have very happy campers at the end of the meal. Wouldn't it be nice not to have to coax, threaten or barter at dinner?

For this dish, I heated a saute pan, added some oil and simply cooked the chicken tenders (you could also use a breast), one side at a time, without moving it very much. For the last 2-3 minutes, I added the sauce and a cover. This sauce would also go well with chicken thighs, pork tenderlon and without a doubt, ribs. If you don't eat meat, try it on tofu or mix it with tomato sauce and serve over pasta. Next time you are looking for a good bbq sauce for the family, try this one.

Tuesday, January 6, 2009

Crunchy Chicken Tenders-Good Taste and Great Value

A friend of mine recently asked for a recipe for some chicken tenders I had made. Talk about having no recollection! When she described it to me, she said it was breaded and either baked or pan fried and that I said it was a healthy version of chicken tenders.

Could that be because it was just chicken breast and not other parts of the chicken? Or maybe because I used olive oil? Who knows what I did 6 months ago. But, I was determined to recreate the dish.

And before we get into the how to's, let's talk about value. Generally, when ever you make your own, you will save money. The chicken cost about $6.25. The other ingredients maybe totaled $1.00. Add pasta with sauce ($1.50) or rice ($.50) along with some organic veggies ($2.00), and you have a great meal for under $11.00! Plus, you might have extra for the next day. I think of that as a good value. Here's how I did it.

I will have to admit, these might have come out a bit browner if I had pan fried them rather than baked them. But, although it might not look crisp from a lack of color, they actually were quite crunchy.

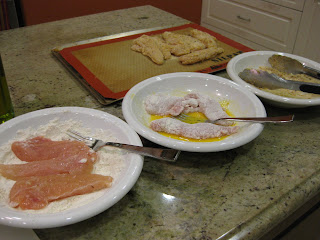
Initially, I didn't want to take the trouble to set up my "breading station"; 3 bowls each with seasoned flour, egg and breadcrumbs. When we tasted the tenders, though, I realized it was worth it.

Here are a few tips I have for you whenever you bread anything:
*You don't need much flour. If you need more, just add to your bowl.
*Never reuse the flour once it's been used for breading raw meat; bacteria from the meat can be cross contaminated onto other food. Throw it out. That goes for the egg and bread crumbs as well.
*I almost ran out of egg. I could have added a few drops of water or milk to extend it.
*Don't leave the food sitting in the egg for very long; it will absorb it and then you might run out of egg.
*Season the breadcrumbs with salt and pepper at a minimum.
*Add cornmeal to the breadcrumbs for extra crunch (the cornmeal you would use to make cornbread, not polenta)
*Try Panko (Japanese breadcrumbs) to make your food even crispier
*Use one hand for the dry ingredients and one hand for the wet.
*If you don't have bread crumbs, toast 3-4 slices of bread, allow to cool and then place in a food processor to chop up.
*Other things you can bread: pounded chicken breast or pork (cutlet), veggies, tofu, or firm white fish like cod.

A standard breading station: flour, egg, and breadcrumbs (yes, this is what you learn in culinary school!)

This is what it looked like coming out of the oven. I apologize for the funky angle of the shot. I was trying to show you the temperature reading on the thermometer.

The final result: lightly toasted chicken with a crunchy breading. To make sure it's cooked, check the temperature of the largest tender. You can also touch it to see if it springs back or cut it (but remember when you do that, you can lose the juices and it might become dry).

My family ate these as is but you could always dip with ketchup, honey-mustard, ranch dressing or bbq sauce. My husband was surprised to learn I had made them from scratch; he thought I had bought them. But, I think he meant it as a compliment...right?!

A few other notes:
*You can make ahead and freeze before baking. Once frozen, store the tenders in an airtight freezer bag. Increase cooking time by about 5-10 minutes. Make sure to check for doneness.
*I used 1.3 pounds of chicken tenders which yielded 12 pcs. It might have been too much for one meal for a family of four. However, the tenders were even good to snack on cold the next day.
*If you want to pan fry, heat pan to medium, add oil to cover bottom of pan and add tenders. Don't stir too much and allow to brown. Tenders should be golden brown on each side.
*If a breading station looks like too much work, just flour the tenders with seasoned flour (salt, pepper and maybe an Italian or salt-free seasoning).

Crunchy Chicken Tenders

1/4 - 1/3 c white flour
1/4 tsp salt
1/8 tsp pepper

1 egg

1/2 c dry bread crumbs (look for fresh, dried bread crumbs from your grocery store)
2 Tbl cornmeal
1/2 tsp salt
1/2 tsp salt free garlic seasoning (or Italian seasoning)

1 - 1 1/2 lb free range, no antibiotic chicken tenders (or use chicken breast and cut into strips)
1 Tbl olive oil

1. In 2 separate shallow bowls, combine the flour with seasoning and the breadcrumbs with seasoning. In another shallow bowl, using a fork or whisk, beat egg until combined.
2. If the chicken is "wet", blot dry with a paper towel (this can happen if it's been defrosted).
3. Place chicken in flour, tapping away excess flour, then the egg, then the breadcrumbs, tapping away excess breading. Place on a sheet pan lined with a silicone mat or that has been sprayed with non-stick cooking spray or rubbed with oil.
4. Pre-heat oven to 425 degrees F.
5. Repeat with remaining chicken. Pour olive oil over chicken. Bake for 15-18 minutes or until the chicken is cooked, turning once after 10 minutes. Chicken should be at least 165 degrees F.