 A friend of mine recently asked for a recipe for some chicken tenders I had made. Talk about having no recollection! When she described it to me, she said it was breaded and either baked or pan fried and that I said it was a healthy version of chicken tenders.
Could that be because it was just chicken breast and not other parts of the chicken? Or maybe because I used olive oil? Who knows what I did 6 months ago. But, I was determined to recreate the dish.
And before we get into the how to's, let's talk about value. Generally, when ever you make your own, you will save money. The chicken cost about $6.25. The other ingredients maybe totaled $1.00. Add pasta with sauce ($1.50) or rice ($.50) along with some organic veggies ($2.00), and you have a great meal for under $11.00! Plus, you might have extra for the next day. I think of that as a good value. Here's how I did it.
I will have to admit, these might have come out a bit browner if I had pan fried them rather than baked them. But, although it might not look crisp from a lack of color, they actually were quite crunchy.
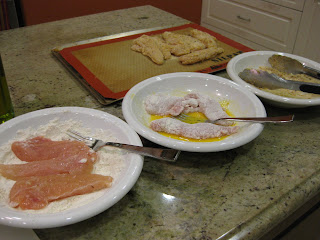
 Initially, I didn't want to take the trouble to set up my "breading station"; 3 bowls each with seasoned flour, egg and breadcrumbs. When we tasted the tenders, though, I realized it was worth it.
Here are a few tips I have for you whenever you bread anything:
*You don't need much flour. If you need more, just add to your bowl.
*Never reuse the flour once it's been used for breading raw meat; bacteria from the meat can be cross contaminated onto other food. Throw it out. That goes for the egg and bread crumbs as well.
*I almost ran out of egg. I could have added a few drops of water or milk to extend it.
*Don't leave the food sitting in the egg for very long; it will absorb it and then you might run out of egg.
*Season the breadcrumbs with salt and pepper at a minimum.
*Add cornmeal to the breadcrumbs for extra crunch (the cornmeal you would use to make cornbread, not polenta)
*Try Panko (Japanese breadcrumbs) to make your food even crispier
*Use one hand for the dry ingredients and one hand for the wet.
*If you don't have bread crumbs, toast 3-4 slices of bread, allow to cool and then place in a food processor to chop up.
*Other things you can bread: pounded chicken breast or pork (cutlet), veggies, tofu, or firm white fish like cod.
 A standard breading station: flour, egg, and breadcrumbs (yes, this is what you learn in culinary school!)
 This is what it looked like coming out of the oven. I apologize for the funky angle of the shot. I was trying to show you the temperature reading on the thermometer.
The final result: lightly toasted chicken with a crunchy breading. To make sure it's cooked, check the temperature of the largest tender. You can also touch it to see if it springs back or cut it (but remember when you do that, you can lose the juices and it might become dry).
My family ate these as is but you could always dip with ketchup, honey-mustard, ranch dressing or bbq sauce. My husband was surprised to learn I had made them from scratch; he thought I had bought them. But, I think he meant it as a compliment...right?!
A few other notes:
*You can make ahead and freeze before baking. Once frozen, store the tenders in an airtight freezer bag. Increase cooking time by about 5-10 minutes. Make sure to check for doneness.
*I used 1.3 pounds of chicken tenders which yielded 12 pcs. It might have been too much for one meal for a family of four. However, the tenders were even good to snack on cold the next day.
*If you want to pan fry, heat pan to medium, add oil to cover bottom of pan and add tenders. Don't stir too much and allow to brown. Tenders should be golden brown on each side.
*If a breading station looks like too much work, just flour the tenders with seasoned flour (salt, pepper and maybe an Italian or salt-free seasoning).
Crunchy Chicken Tenders
1/4 - 1/3 c white flour
1/4 tsp salt
1/8 tsp pepper
1 egg
1/2 c dry bread crumbs (look for fresh, dried bread crumbs from your grocery store)
2 Tbl cornmeal
1/2 tsp salt
1/2 tsp salt free garlic seasoning (or Italian seasoning)
1 - 1 1/2 lb free range, no antibiotic chicken tenders (or use chicken breast and cut into strips)
1 Tbl olive oil
1. In 2 separate shallow bowls, combine the flour with seasoning and the breadcrumbs with seasoning. In another shallow bowl, using a fork or whisk, beat egg until combined.
2. If the chicken is "wet", blot dry with a paper towel (this can happen if it's been defrosted).
3. Place chicken in flour, tapping away excess flour, then the egg, then the breadcrumbs, tapping away excess breading. Place on a sheet pan lined with a silicone mat or that has been sprayed with non-stick cooking spray or rubbed with oil.
4. Pre-heat oven to 425 degrees F.
5. Repeat with remaining chicken. Pour olive oil over chicken. Bake for 15-18 minutes or until the chicken is cooked, turning once after 10 minutes. Chicken should be at least 165 degrees F.


No comments:
Post a Comment