Anyone can be "the family chef". You just need good recipes and techniques! Chef Amy Fothergill shares her best recipes with you for quick and easy dishes with an emphasis on gluten-free.

Get information here about her cookbook, The Warm Kitchen: Gluten-Free Recipes Anyone Can Make and Everyone Will Love.

Friday, April 20, 2012

Gluten free and dairy free Caesar salad dressing recipe


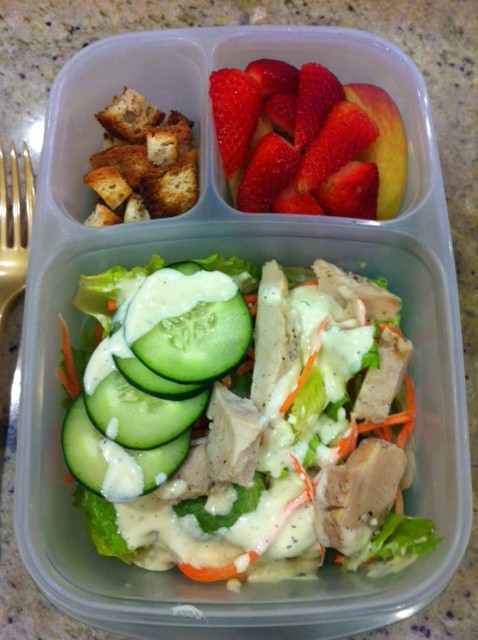
Think outside the sandwich with Caesar salad!

Running out of gluten-free and dairy-free lunch ideas for your kids’ lunchboxes? This can be a particular challenge when most traditional options revolve around bread and cheese. Of course you can always use gluten-free bread to make the traditional turkey or peanut butter and jelly, but why not think outside the standard lunch box fare and prepare a fresh salad? Children are often big fans of Caesar salad for the creamy dressing, pleasantly non-bitter romaine lettuce and the crunchy croutons. I love to use Easy Lunchboxes since it’s easy to keep everything separated; the croutons would be a bit mushy if I put them on in the morning!

I usually make this dressing with Parmesan cheese but have had a few people request a dairy-free version. I adapted this recipe, which is a fan favorite, by eliminating the cheese and adding the Dijon mustard. In my opinion, it’s almost identical. My family gave it the double thumbs up! If you want really traditional, you can top it with anchovies (a bit too fishy/salty for our tastes, though).

The recipes below give you an option of that beloved crunch and the creaminess you get from a restaurant Caesar salad without the use of wheat or dairy. I make the dressing with regular mayonnaise, which is made from egg and naturally dairy free, and the croutons I prepare from gluten-free sliced bread or baguette. With a few key ingredients on hand you’ll be surprised how easy it is to prepare!

Dairy-Free Caesar Salad Dressing (or dip)
1-2 garlic cloves, cut into 4-6 pieces
1/2 cup regular mayonnaise
3 tablespoons olive oil
1 1/2 teaspoons kosher salt or 1 teaspoon table salt
2-3 tablespoons fresh lemon juice
1/4 teaspoon ground pepper
1/2 teaspoon Dijon mustard

Place all ingredients in a small food processor and blend for 1-2 minutes. Keep refrigerated until ready to use. Toss with crisp, romaine lettuce pieces, cucumber slices and shredded carrots. Optionally add 2-3 ounces of grilled chicken per person.

Gluten-Free Croutons
½ loaf gluten-free baguette bread, cubed, or about 6 slices gluten-free bread cut into cubes
2-3 tablespoons olive oil
1/2 teaspoon kosher or sea salt
1/4 teaspoon each ground black pepper, oregano, and thyme

Toss bread with olive oil and seasonings. Place on a baking sheet. Bake in a 400F oven until brown and crisp. Store covered at room temperature.

Caesar salad

Wednesday, March 28, 2012

Green smoothies: The new fun way to drink your veggies!


 Thank you to Hilary Greenleaf for the complimentary e-book for use in this review.

Author Hilary Greenleaf brings new meaning to the idea of drinking your troubles away. She asked me if I’d review her latest book, The New Green Smoothie Diet, and I must say Greenleaf really pours on advice and nutritious recipes in a pretty digestible 35-page read. Available in both hard copy and e-book form, Greenleaf writes that the key to her green smoothies is combining fruits and vegetables in a respective 60 to 40 percent ratio so you can get the benefits of each while avoiding the often-bitter taste of raw vegetables. She offers information on maintaining good, general health as well as tips and recipes for specific interests ranging from hair care to cancer prevention. Trying to lose weight? Trim off a few pounds with the help of a Blackberry Lettuce Smoothie. Want to ward off that nasty cold that’s been going around? Then The Mighty Citrus Smoothie should do the trick.

The handy thing about smoothies is that it’s so simple (and fun!) to pack in a ton of colorful nutrition in such a condensed space. Many fruits and vegetables give us vitamins A and C, plenty of fiber and countless antioxidants and other disease-fighting benefits. If your kids turn their nose up at raw kale maybe they wouldn’t mind drinking a naturally sweetened version in a fun cup or pretty glass. For example, I think most kids will be delighted with the mauve color of the Energy Booster Smoothie and will likely not notice the spinach flavor so much.


As long as you’re not expecting Jamba Juice, you should be quite satisfied with the natural sweetness level of these smoothies. For kids, Greenleaf recommends upping the fruit portion to 70 percent until they get used to the flavor. You can also sweeten the concoction with natural, fruit-sugar containing mango or pineapple or by squirting in some citrus juice. Greenleaf actually discourages the use of fruits that naturally contain a lot of sugar, but if a little orange or mango juice helps my kids swallow their leafy greens, I’m pretty happy!

Sunday, March 11, 2012

Quinoa and corn cakes recipe

I'm going to really try to not tell a super long story so you can get right to this recipe. Promise.

A friend of mine brought me one of these a few weeks ago; she had just made a batch and I was very excited to try them. I pictured it being more like a crab cake when she described it but it was closer to a griddle cake since it's flat.

My 6 year old daughter was in the room when she arrived with the sample. I'm thinking, "Oh yeah, it's doesn't have sugar. My daughter won't want this." Wrong.
"What's that, Mama?" she asked.
"Something with quinoa; I don't think you'll like it." (it smelled so good, I really did not want to share this).
"Can I have some?"
"Sure honey" and I gave her a piece.
"Uhmm, that's good!" she says "Can I have more?". At least she has good manners.
"Of course, you can. I'll give you half." but inside I was like, really? You want this? Woe is me. Never assume what your kids will and won't eat. I think I said that.

So, I got the recipe from my friend. It had come from her sister who had gotten it from a magazine in Southern California so I don't know the exact source. I did change some of the amounts and ingredients as well. If I find out where it came from, I will update the post.

I made the quinoa cakes the next week. Surprisingly, everyone (8 year old son and husband included) loved them. What a great way to get some healthy protein for us all! I hope you will give it a try.

Quinoa and Corn Cakes
Makes about 10-12

1/2 cup quinoa
1/2 cup water
1/2 cup chicken or vegetable broth (you can also use all water or broth)
1 large egg
1/2 cup corn (if using frozen, thaw slightly before adding or add to cooked quinoa)
2 scallions, finely chopped (white and green)
1/3 cup red pepper, diced
1/4 cup shredded mozzarella (optional)
1/4 cup The Family Chef's gluten-free flour blend (or all-purpose flour for non gluten-free)
2 tablespoons corn flour (the fine type, not coarse like polenta)
2 tablespoons milk or milk substitute
1/4 teaspoon Kosher salt
1/8 teaspoon ground pepper

Vegetable oil for frying

1. Cook quinoa. If quinoa has not been pre-rinsed (check package), rinse briefly under cold water. Add quinoa, water and broth to a small to medium sized pot with a pinch of salt. Bring to a boil, lower to a simmer and cover. Cook 10-12 minutes or until all of the water has absorbed. Cool slightly.
2. In a medium bowl, add egg and beat. Add remaining ingredients including quinoa but not the vegetable oil and mix with a spoon or rubber spatula/scraper. If mixture is very wet and won't hold together, add another tablespoon of the flour mixture.
3. Place a thin layer of vegetable oil in a medium to large non-stick pan. Heat pan to medium. When pan is hot, add 1/4 cup of the quinoa mixture and press down with a spatula to make a griddle cake. Make sure to leave room between each one. Cook about 2-3 minutes or until one side is golden brown. Flip over and cook the other side. They don't always stay together perfectly but that's ok; they taste great.
4. Serve cakes immediately or at room temperature, plain or with a tomato salsa.

Tuesday, March 6, 2012

Vegetable and bean soup recipe


One thing I'm good at is looking in the fridge and seeing a meal I can create. One friend said to me once "You look at a cucumber and see 5 ways you can use it. I look at it and see a cucumber." Well, that's why I'm here!

On this particular night, I had lots of veggies in the fridge, a few cans of beans, and a can of diced tomatoes. I always keep gluten-free pasta and chicken broth on hand so to me, that said soup. I cut up the onions, carrots and celery and sauteed them while I opened the cans of beans and diced some other veggies. In well under an hour, dinner was served much to the delight of my family on a chilly night. To learn how to make soup, check this blog entry.

Don't think healthy cooking has to be complicated; it doesn't. But you do need to keep a few things around. My go-to items for soups are:
  • Onion, carrot and celery
  • Chicken or vegetable broth
  • Beans like garbanzo, black, kidney and cannellini or great northern white

You can always add other ingredients like vegetables, diced tomatoes, lentils or split peas, pasta or grains. Salt is essential for flavor along with some seasoning. The basic steps are:
1) Saute the onions, carrot and celery with seasonings.
2) Add broth, beans and any other liquid ingredients (for example, diced tomatoes) and simmer about 20-30 minutes.
3) You can cook pasta, grains or rice in the soup as long as there is enough liquid. Cook based on the amount of time it takes to cook the item (10 minutes for pasta, 20 minutes for rice, etc.).
4) Add fresh vegetables like broccoli, beans or cauliflower during the last 5 minutes of cooking. Other harder veggies like sweet potatoes need longer to cook. Add them before.
5) Taste at the end to make sure there is enough salt.

I suppose you can call this a minestrone soup but I like to focus on the extra veggies. Try this any night of the week. I think your family will love it and you!

Vegetable and Bean Soup
Serves 4-6

2 teaspoons olive oil
1/2 onion, chopped
2 carrots, peeled and chopped
2 celery stalks, peeled and chopped
1/2 teaspoon each pepper, oregano, thyme

2 cloves chopped garlic (optional)
1/2 teaspoon salt

1 quart vegetable or chicken broth plus 2 cups water (omit water if if you aren’t cooking any grains, pasta or rice)
1 can garbanzo beans, drained and rinsed
1 can kidney beans, drained and rinsed
1 can white beans, drained and rinsed
1 15 oz can diced tomatoes, not drained

2 cups cooked or 1 cup dry small pasta like little ditalini, shells or elbows (I use gluten-free)
1-2 cups total assorted chopped vegetables like broccoli, cauliflower, string beans, zucchini, red pepper or kale

Toppings:
1/2 cup parmesan cheese
2-3 Tablespoons pesto

1.    Heat large soup pot to medium first. Add oil, then onion, carrot, celery, and seasonings. Stir once and cook, stirring only occasionally, making sure vegetables don’t burn but that they are browning. Continue cooking until the vegetables are golden and softened.
2.    Add garlic and salt and cook for 1 minute.
3.    Add broth, water, all of the beans, and diced tomatoes. Simmer 20 minutes uncovered.
4.    Add dry pasta, rice or grain to the soup and cook until done (base additional cooking time on how long the item takes).
5.    Add additional veggies and cook another 3-5 minutes or until the veggies are soft.
6.    Top each bowl with grated Italian cheese and/or pesto. Enjoy!

Saturday, February 18, 2012

Gluten-free Fruit and Berry Crisp Recipe

 
This recipe is so good, you will also want seconds!

What I love about this recipe is that you can make it all year round. In the summer, there is a bounty of fruit like peaches, apricots, nectarines, and all types of berries. In the winter, you can use apples, pears, and frozen fruit. The recipe is very forgiving as well. You can measure the fruit or just put enough to fill your pan. Use what's on hand and check the freezer.

I love using berries in my crisp recipe because they are so healthy. We are lucky to have Driscoll's Berries available in stores where I shop. I like that they are just down the road in Watsonville, produce tasty berries and offer a wide variety of organic products. For the crisp above, I used raspberries, blueberries, frozen peaches and fresh apple slices.

Remember, berries freeze very well so get them when they are fresh from the market, lay them flat on a cookie sheet, freeze, then transfer to a freezer-safe bag or container. The bag is a little better because you can remove the air which can cause freezer burn. If you wash your berries, make sure they are dry before freezing. I give mine a quick rinse and gently pat them with a paper towel to avoid breaking them.

I have been making this fruit crisp for a long time. When I went gluten-free, I adapted it so the whole family could enjoy it. It continues to be a favorite of my family, friends and students in my classes. It can be served as is, with ice cream or heavy cream, yogurt or, for a dairy-free ice cream, try some vanilla coconut "ice cream".

If you are concerned about the oats (some people can't even tolerate the gluten-free variety), add more gluten-free flour mix and chopped nuts. To save time, measure the crisp ingredients (except the butter) beforehand and keep it in a bowl until you are ready to bake. Instead of a store-bought dessert, why not give this one a try? I'll bet everyone will appreciate it!

Watch the how-to video here on The Family Chef You Tube channel.


Gluten-Free Fruit and Berry Crisp 

Crisp Topping:
1/2 cup Amy's gluten-free flour mix
1/3 cup gluten-free quick oats (if you can’t tolerate oats, substitute with more gluten-free flour mix and/or more chopped nuts)
1/3 cup organic white or cane sugar
1/2 teaspoon Kosher salt  (use 1/4 teaspoon of table salt)
1 teaspoon ground cinnamon
Optional: 1/2 cup chopped nuts (chop first, then measure)
6-8 Tablespoons melted unsalted butter or vegetable oil (use less if you are watching calories; more if you want a crisper topping)

Filling:
4 cups sliced, peeled and cored fruit like apples, pears, peaches, nectarines and/or blueberries, blackberries or olallieberries (use all of one or a combination)
1/3 – 1/2 cup sugar or agave nectar (use more sugar or agave if the fruit is tart or if you use more than 4 cups)
2 Tablespoons cornstarch or any other starch like tapioca or arrowroot


1.    Preheat the oven to 375F. Grease a 2 to 2-1/2 quart baking dish or deep pie dish.
2.    Make the Crisp Topping and set aside.
3.    Mix the fruit, sugar and cornstarch and toss gently. Transfer the fruit mixture to the baking dish and cover with the crisp topping, spreading evenly.
4.    Place in the oven and bake until the top is well browned and the fruit is tender when pierced with a knife, about 30-35 minutes.
5.    Serve with whipped cream or ice cream.

Wednesday, February 1, 2012

Stretch Island offers next best alternative to fresh fruit!


 Thank you to Stretch Island Fruit Company for the complimentary sample to review this product.

I try to give my family fresh fruit but it’s not always easy, especially when we are on the go. Sometimes I need a back-up plan. Stretch Island offers an alternative to fresh fruit with their dried fruit puree snacks. One of their newer products, the FruitaBu's Smooshed, has been a big hit.

My kids have tried all three flavors (apple, strawberry and grape) and compete for them if there's only one for a lunch box! The sugar level in this fruit snack comes in a little high, but it’s naturally occurring, comes with a good amount of potassium and counts as a full serving of fruit. Just make sure to round out your children’s snack with a form of whole grain such as a whole grain cracker or protein, like nuts.
In addition to the product itself, I also like the fact that the Stretch Island company gives back to the community. Through teaming up with the Fruit Tree Planting Foundation, the company created Fruit Tree 101. The resulting program plants lessons in sustainability and eating right in the form of orchards it donates to schools across the country. Students and teachers at these schools work together to plant the trees and discuss the fruit’s importance for human health and the environment. How idyllic!

Back in November, students at one San Francisco elementary school and one high school planted apples, pears, berries and citrus fruit trees and shrubs -- more than 60 all together and some standing up to seven feet tall. (Check out photo above)

My kids appreciate the fun factor in their fruit and I take comfort in knowing the company prides itself on good health and social responsibility.

Plus, I agree that the product is tasty!


Monday, January 23, 2012

Butternut Squash Risotto

Butternut Squash Risotto

This is a hearty dish perfect for late fall or winter. It’s also wonderful with any root vegetable like turnip, carrot, parsnip, rutabaga, and sweet potato. If you don't want to bother cutting the squash many stores offer it pre-cut.

For more nutrition, use the same amount of barley as rice, except soak it in cold water for 5 minutes, then drain. It takes longer to cook but is very tasty. This dish can be made gluten-free, just make sure the broth is labeled gluten-free and skip the barley.

Butternut Squash Risotto

Makes 4-6 servings

Olive oil
2-3 shallots, minced (can substitute 1 onion, chopped)
Pepper
1-2 garlic cloves
1 tsp salt
Butternut squash (about ½ of a large), peeled, seeded, chopped
1 cup of arborio rice
1/4 cup dry white wine or sherry
4 cups of vegetable or chicken broth, heated
2 Tbl unsalted butter
Chopped fresh sage or thyme

1. Heat oil and butter in large pot. Sauté the shallots with pepper until soft and golden. Add garlic and salt and stir for 1 minute.
2. Add squash and cook until squash begins to soften, stirring. Add the rice and stir, then add the wine or sherry. Cook until wine/sherry is absorbed.
3. Stir in 1/2 cup broth and stir, keeping at a simmer throughout, until absorbed. Continue simmering and adding broth, about 1/2 cup at a time, stirring frequently. Allow each addition to be absorbed before adding next and until rice is tender and creamy-looking but still firm, about 18 minutes.
4. Add butter at the end to add extra creaminess, and chopped sage or thyme for flavor. If you don’t have fresh herbs, add ½ tsp of one or the other in step 1 when you add the shallots.